Projects
Let me introduce the project that I worked on!!

1. Motivation
I always wanted to make my own homepage.
I tried to make it using react and node.js, but it took a long time to learn design and coding.
Therefore, while looking for a simple way to make it, I learned how to create a blog with github.
2. Start github blog
- Start with github_blog_create
- Choose one from Jekyll theme
- check README–> check Github pages
- Import it to ‘local’ using git clone, modify code using VScode, and
git push- After that, add, commit, and push are repeated to continue pushing.;;
- Check the local build of README.
- But I may not know what you mean…
3. Local build detailed method
- Install ruby Install Jekyll
- Go from Ruby ‘start command’.
![Image]()
- Enter
gem install bundler jekyllafter going to code address imported to ‘local’ via cd
![Image]()
![Image]()
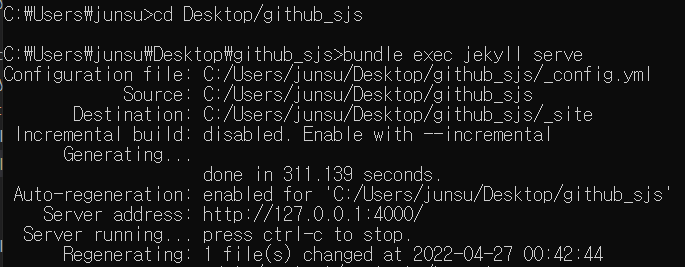
- Enter
bundle exec jekyll serveafter installation is completed
![Image]()
- Enter http://localhost:4000/ in Chrome after loading!!
Then, you can see that it’s floating well
4. Analyzing my own homepage code
| name | detail | Info |
|---|---|---|
| _data | owner | Where to enter your name and personal information |
| conf | In the main, add a language and change the picture on the left | |
| content | Place to manage Project | |
| lang | Where you enter the contents of home and the overall contents of the homepage | |
| _layouts | - | Determine the overall tools for the categories on the left |
| _post | - | Place to manage (En)Blog |
| assets | img | Where to save pictures |
| tabs | - | Place to manage (En)links and (En)About |
| index.md | - | Where to change (En)home’s photo |
| ko | - | Place to manage (Ko)links and (Ko)About and (Ko)Blog |
| vi | - | Place to manage (Vi)links and (Vi)About and (Vi)Blog |
Oh, it’s hard! But it’s so nice that it’s organized neatly!
Decorate your own homepage from 2022-04-20!
Read less
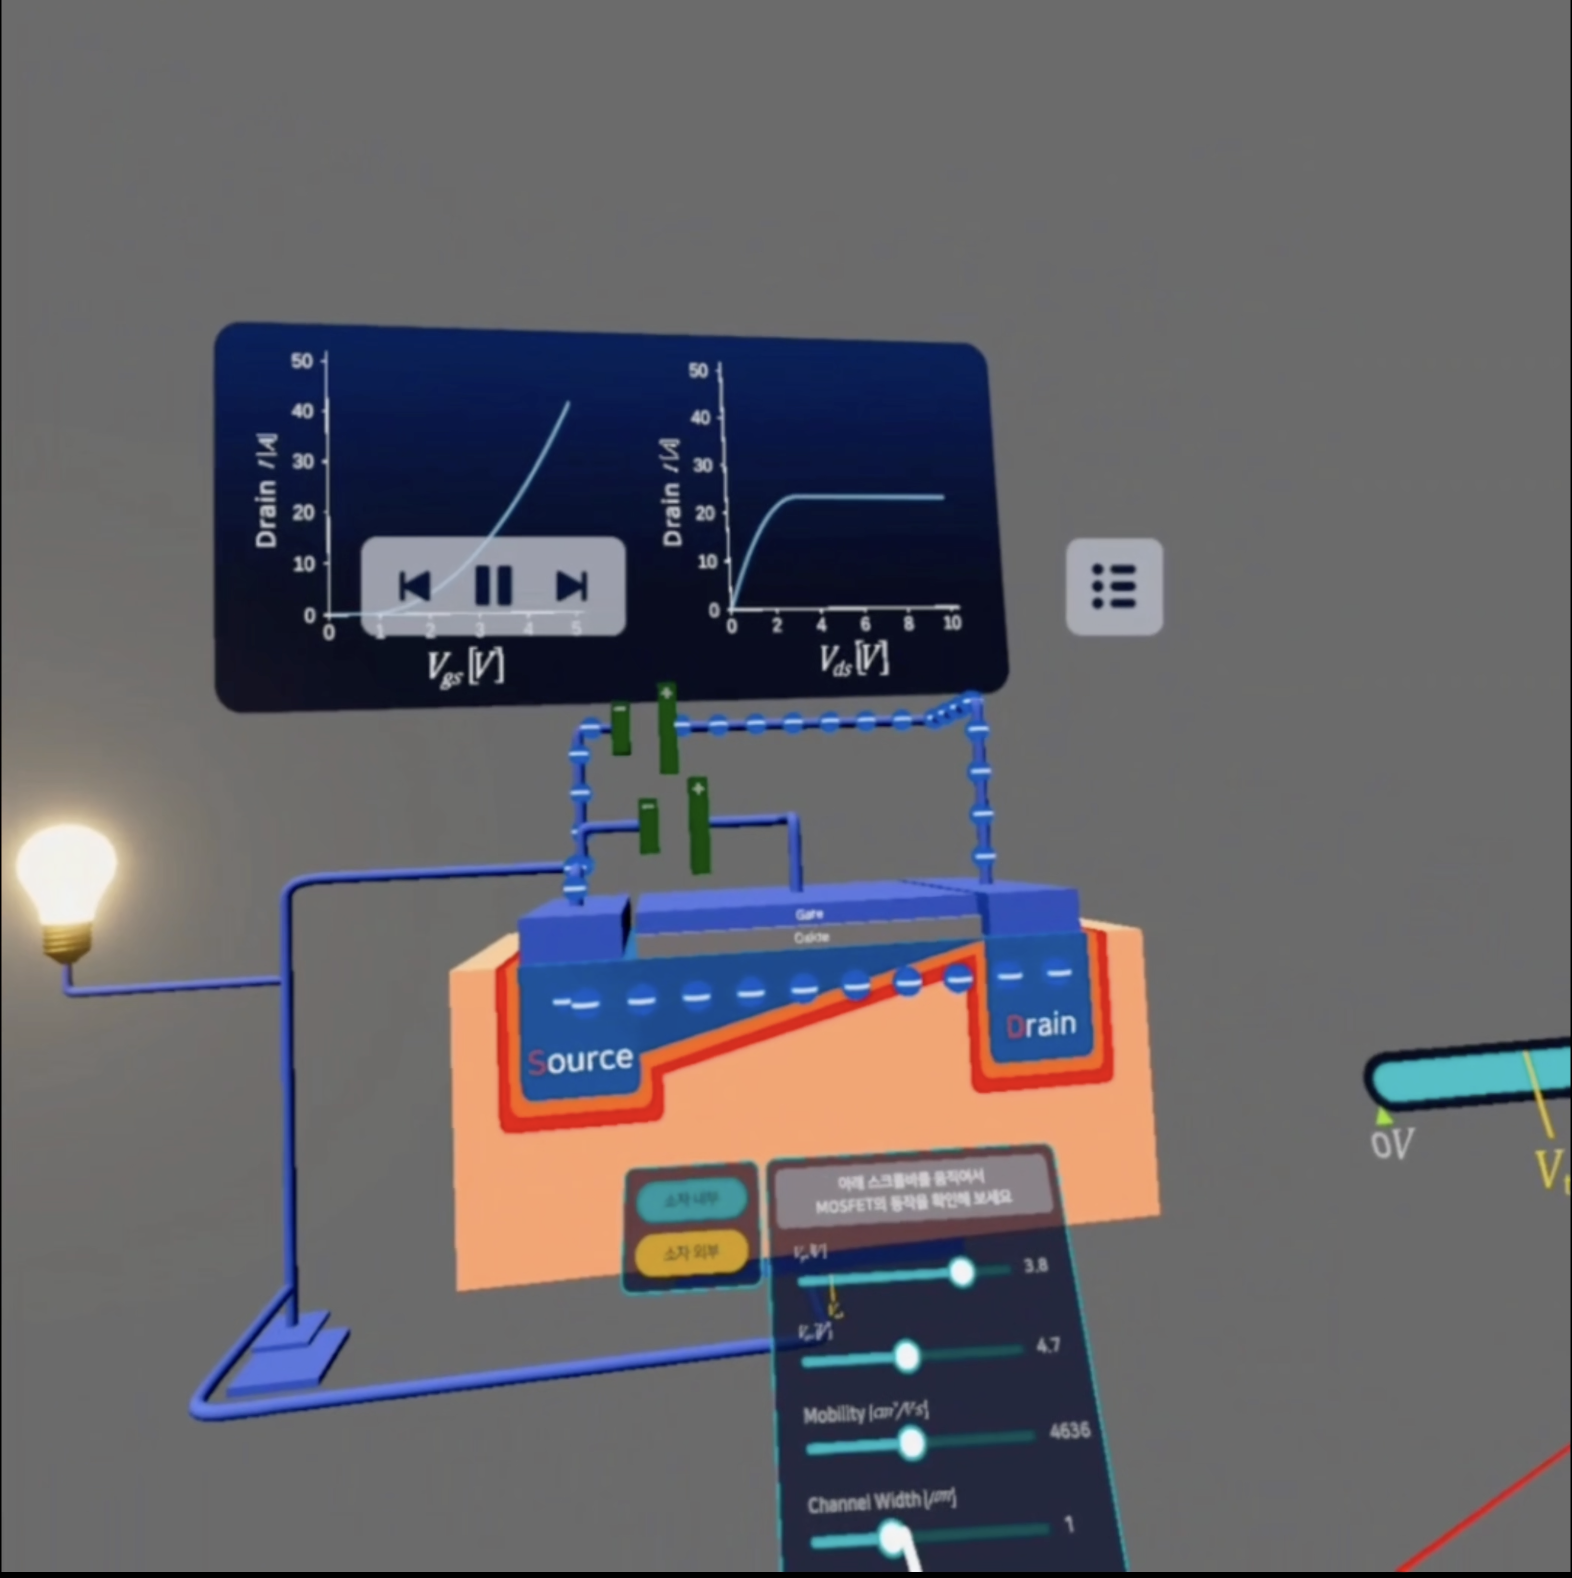
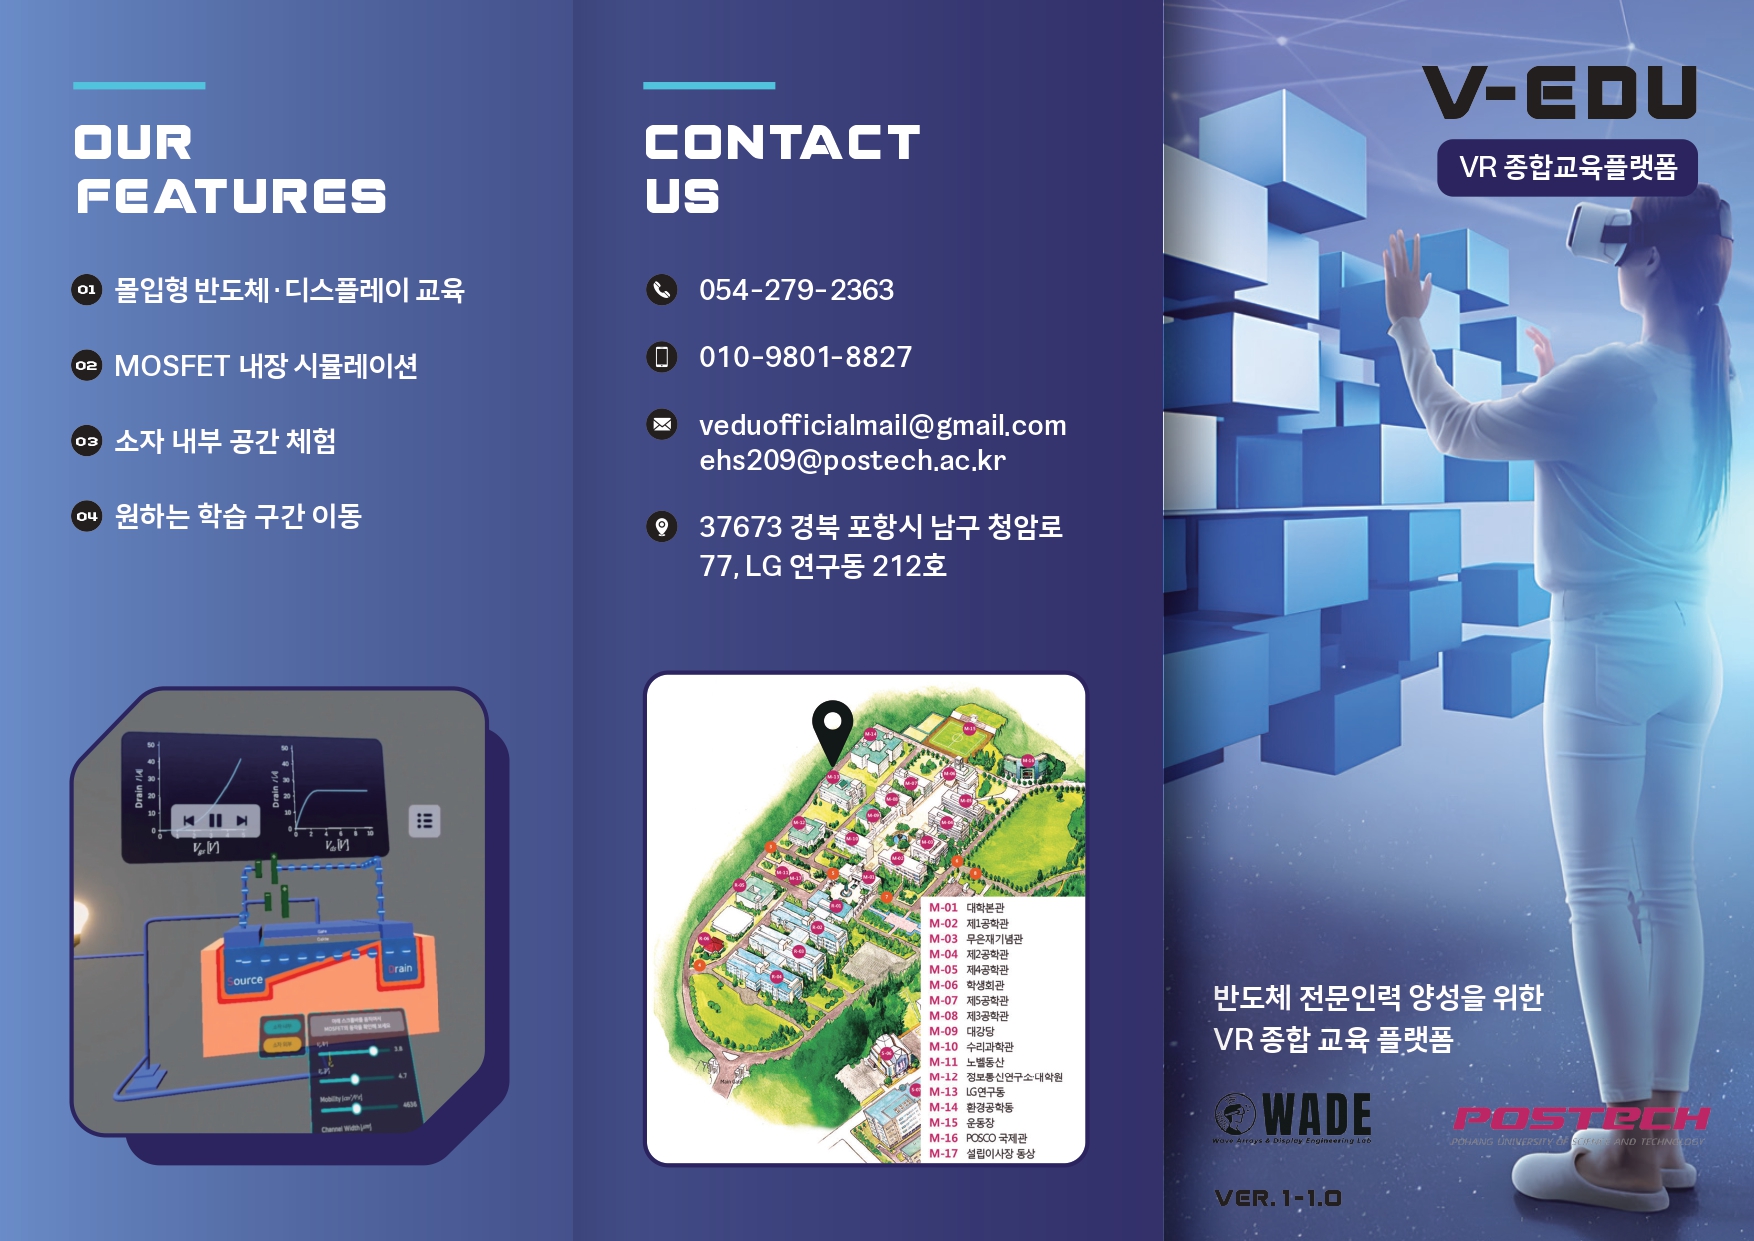
VR Semiconductor and Display Device Educational Content
WADE Lab VR Content from POSTECH (Pohang University of Science and Technology)
1. Motivation
By creating and distributing VR educational content on semiconductors, display devices, and processes that overcome physical limitations and maximize learning effectiveness, we expect to contribute to educational innovation and industrial development.
2. Partner Organizations
- NINT National Institute for Nonomoterials Technology
![Image]()
- RAPA KOREA RADIO PROMOTION ASSOCIATION
![Image]()
- ReadyMade
![Image]()
- POSTECH
- WADE Lab
3. Promotional Video for the Content
4. brochure

Read less
Making a Ferroelectric FET (~2021-11-12)
FeFET production process and Mask production
1. Motivation
Paper : IGZO channel ferroelectric memory FET (Masaharu Kobayashi ,1-4 Sept. 2020)
An experiment was conducted to confirm the ferroelectric phenomenon in ITZO rather than IGZO by adding HZO based on the paper.
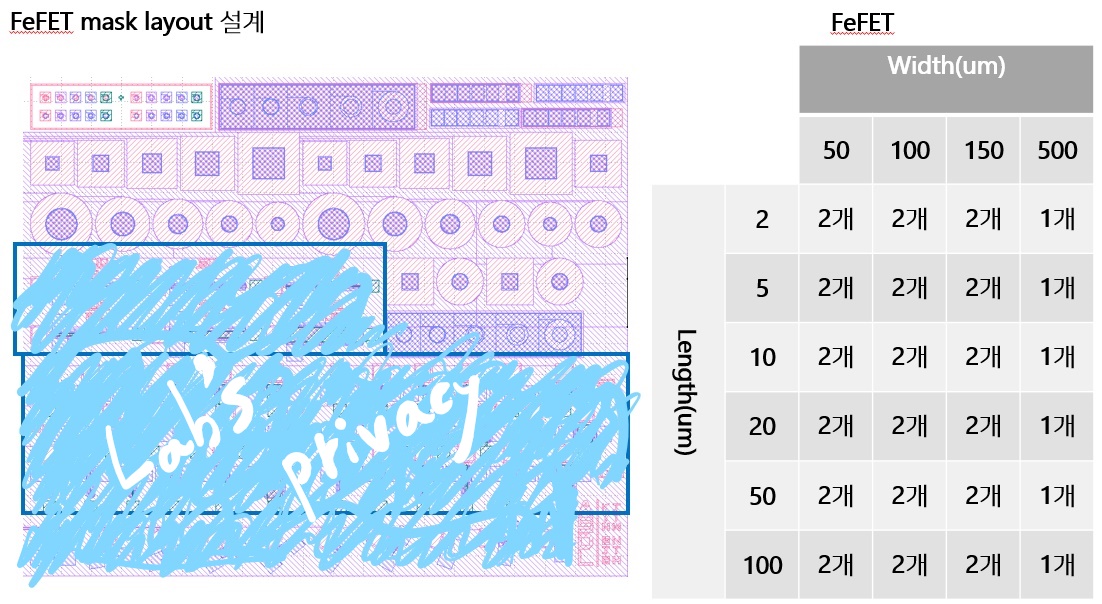
To that end, it is important to plan the manufacturing process of FeFET well, and we made the mask necessary for the photolithography process.
2. Introduction of team members
3. Progress
Please understand that there is a private part of the lab that is covered.

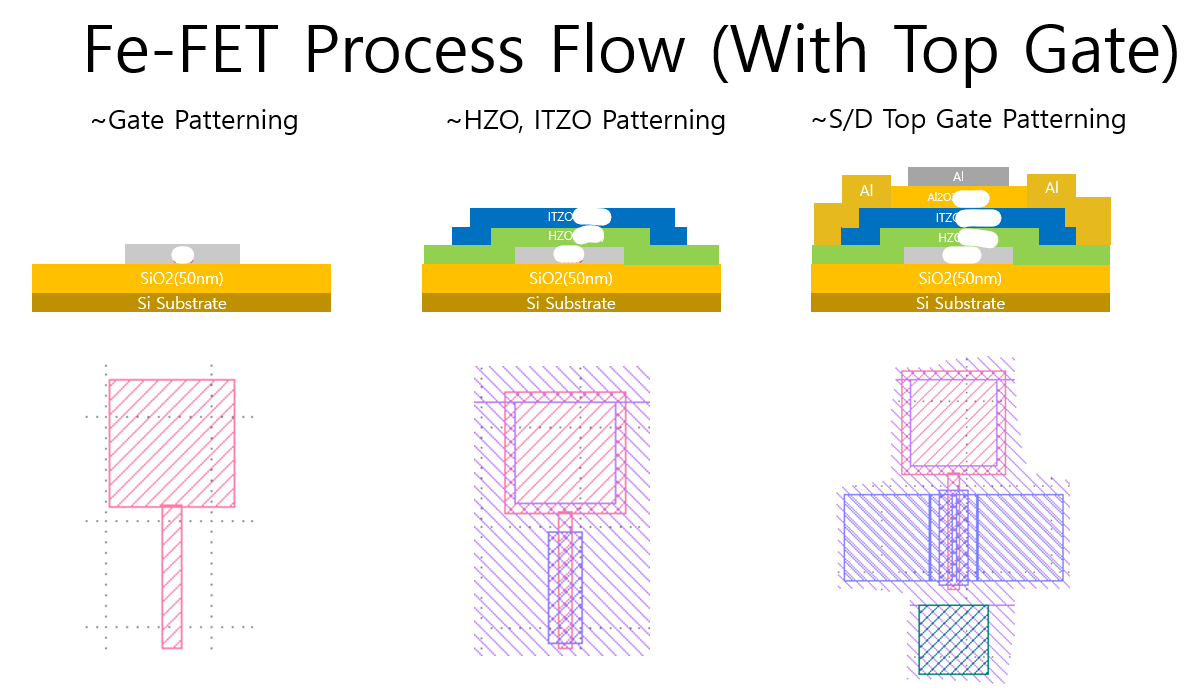
In the process, it is necessary to check how it is deposited on the Si substrate.
Therefore, we check the deposition process while making it using the shape of the ppt.
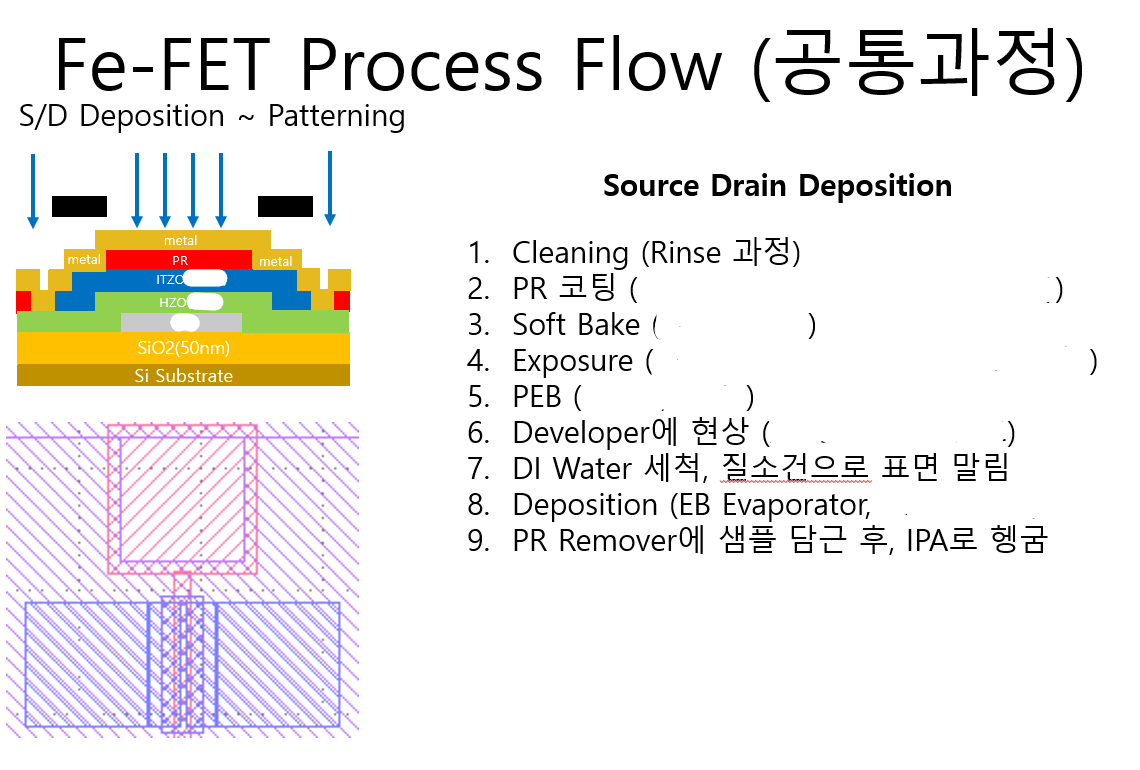
It was also necessary to identify which process was required for each step.
If the mask is not checked several times, the position of the Mask may change.
I may have to wait for the Mask production again, so we need to check carefully.
I made a Mask using Klayout and check the ppt to see if there is any problem.
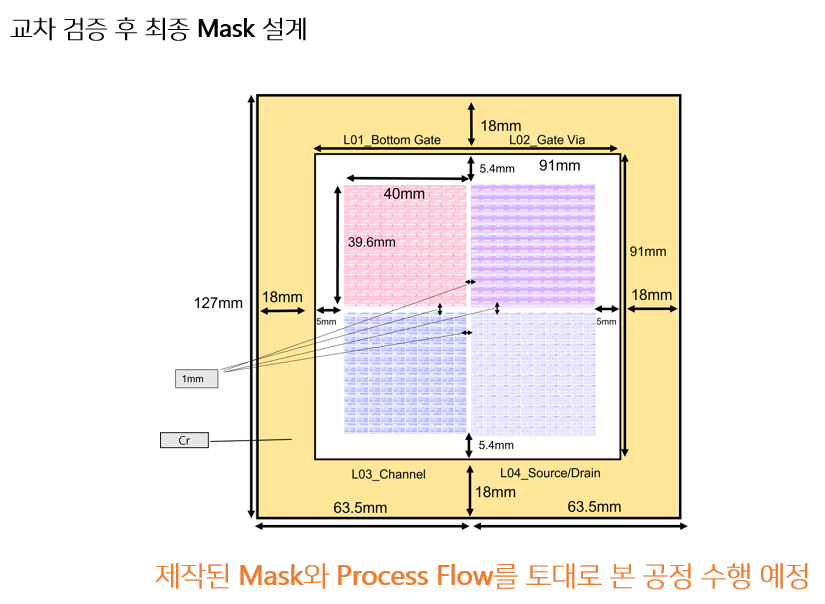
Steps to request the manufacture of the Mask to the company
4. Result
All were completed without re-deposition and the ferroelectic phenomenon was confirmed.
However, the performance was lower than that of IGZO.
5. Code
This is the Klayout python code.
- Making a square
class Square : global layout,unit,top def __init__(self, x, y, width, height,l): self.x = x/unit self.y = y/unit self.width = width/unit self.height = height/unit self.l = l self.lay = layout.layer(l,0) self.box = pya.Box(self.x-self.width/2,self.y-self.height/2,self.x+self.width/2,self.y+self.height/2) def info(self): return pya.Region(self.box) def create(self): obj = pya.Region(self.box) res = top.shapes(self.lay).insert(self.box) return obj def create_hole(self,h_x,h_y,h_width,h_height): h_x = h_x/unit h_y = h_y/unit h_width = h_width/unit h_height = h_height/unit self.h_box = pya.Box(h_x-h_width/2,h_y-h_height/2,h_x+h_width/2,h_y+h_height/2) self.box = pya.Polygon(self.box) self.box.insert_hole(self.h_box) obj = pya.Region(self.box) res= top.shapes(self.lay).insert(self.box) return obj def dup(self,dif_x,dif_y,num): dif_x = dif_x/unit dif_y = dif_y/unit new_obj = self.box total_obj = pya.Region(new_obj) top.shapes(self.lay).insert(new_obj) for i in range(0,num): new_obj = new_obj.dup() new_obj = new_obj.moved(dif_x,dif_y) res = top.shapes(self.lay).insert(new_obj) total_obj += new_obj return total_obj def dup_2(self,dif_x,dif_y,num1,num2): dif_x = dif_x/unit dif_y = dif_y/unit new_obj = self.box total_obj = pya.Region() for i in range(0,num1): if i!=0: new_obj = new_obj.dup() new_obj = new_obj.moved(0,dif_y) for j in range(0,num2): if j ==0 and i!=0: new_obj = new_obj.moved(-(num2-1)*dif_x,0) new_box = new_obj.dup() if j ==0: pass else: new_obj = new_obj.moved(dif_x,0) res = top.shapes(self.lay).insert(new_obj) total_obj += new_obj return total_obj def rotate(self,degree): self.box.move(-self.x,-self.y) rotate = pya.ICplxTrans(1,degree,False,0,0) new_obj =pya.Polygon(self.box).transform(rotate) new_obj.move(self.x,self.y) res = top.shapes(self.lay).insert(new_obj) return new_obj - Making a circle
class Circle:
global layout,unit,top,angle_point

def __init__(self, x, y, r,degree, rotation,l):
  self.x = x/unit
  self.y = y/unit
  self.r = r/unit
  self.l = l
  self.lay = layout.layer(l,0)
  self.degree = degree
  self.n_point = self.degree / angle_point + 1
  self.radian_step = 2.0*pi*(self.degree/360) / (self.n_point - 1)
  self.radian_offset = 2.0*pi*(rotation/360)
  self.points = [pya.Point(round(self.r * math.cos(i * self.radian_step + self.radian_offset) + self.x), round(self.r * math.sin(i * self.radian_step + self.radian_offset) + self.y)) for i in range(int(self.n_point))]

  if self.degree != 360:
    self.points.append(pya.Point(self.x, self.y))

  self.circle = pya.Polygon(self.points)


def create(self):
  res= top.shapes(self.lay).insert(self.circle)
  obj = pya.Region(self.circle)
  return obj

def create_hole(self,r2):
  r2 = r2/unit
  self.points2 = [pya.Point(round(r2 * math.cos(i * self.radian_step + self.radian_offset) + self.x), round(r2 * math.sin(i * self.radian_step + self.radian_offset) + self.y)) for i in range(int(self.n_point))]

  if self.degree != 360:
    self.points2.append(pya.Point(self.x, self.y))

  self.circle.insert_hole(self.points2)

  res= top.shapes(self.lay).insert(self.circle)
  obj = pya.Region(self.circle)
  return obj


def dup(self,dif_x,dif_y,num):
  dif_x = dif_x/unit
  dif_y = dif_y/unit
  new_obj = self.circle
  total_obj = pya.Region(new_obj)
  top.shapes(self.lay).insert(new_obj)

  for i in range(0,num):

    new_obj = new_obj.dup()
    new_obj = new_obj.moved(dif_x,dif_y)
    pya.Region(new_obj)
    res = top.shapes(self.lay).insert(new_obj)
    total_obj += new_obj
  return total_obj

def dup_2(self,dif_x,dif_y,num1,num2):
  dif_x = dif_x/unit
  dif_y = dif_y/unit
  new_obj = self.circle
  total_obj = pya.Region()

  for i in range(0,num1):
    if i!=0:
      new_obj = new_obj.dup()
      new_obj = new_obj.moved(0,dif_y)
    for j in range(0,num2):
      if j ==0 and i!=0:
        new_obj = new_obj.moved(-(num2-1)*dif_x,0)
      new_obj = new_obj.dup()
      if j ==0:
        pass
      else:
        new_obj = new_obj.moved(dif_x,0)

      pya.Region(new_obj)
      res = top.shapes(self.lay).insert(new_obj)
      total_obj += new_obj
  return total_obj
In addition, I have defined codes that make other shapes such as align mark and name.
If you need it or want to use it, please send me an email.
I will explain in detail with my example code.
Read less
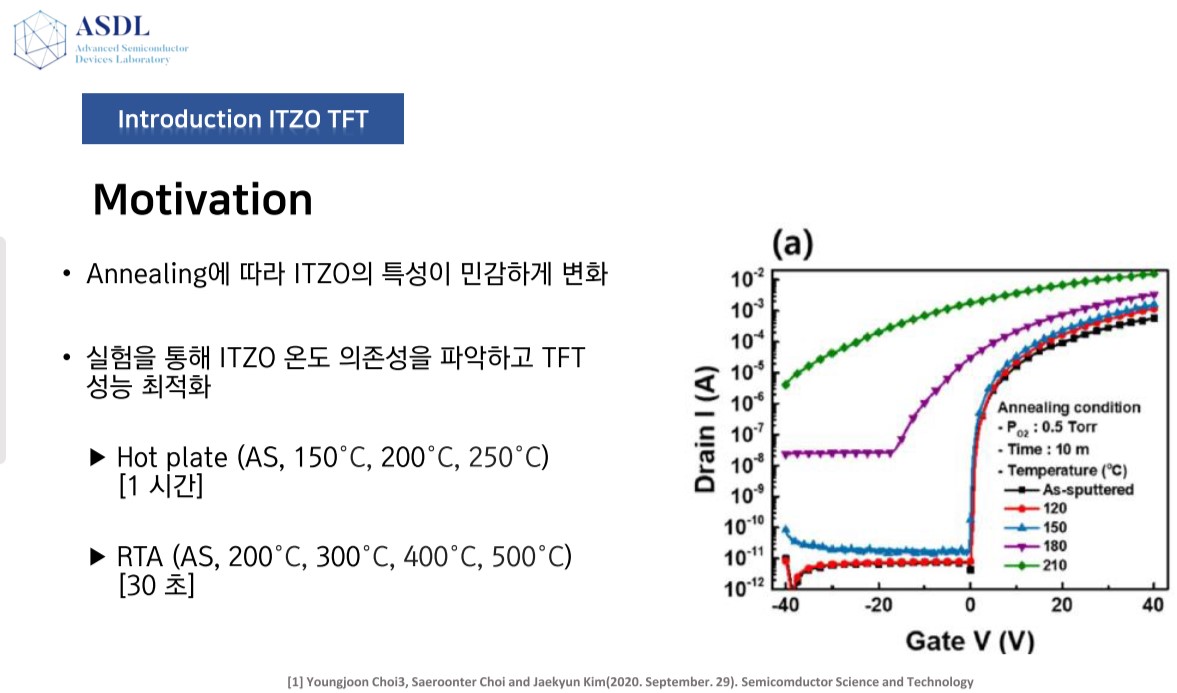
Condition change according to TFT heat treatment conditions [Capstone] (~ 2021-12-01)
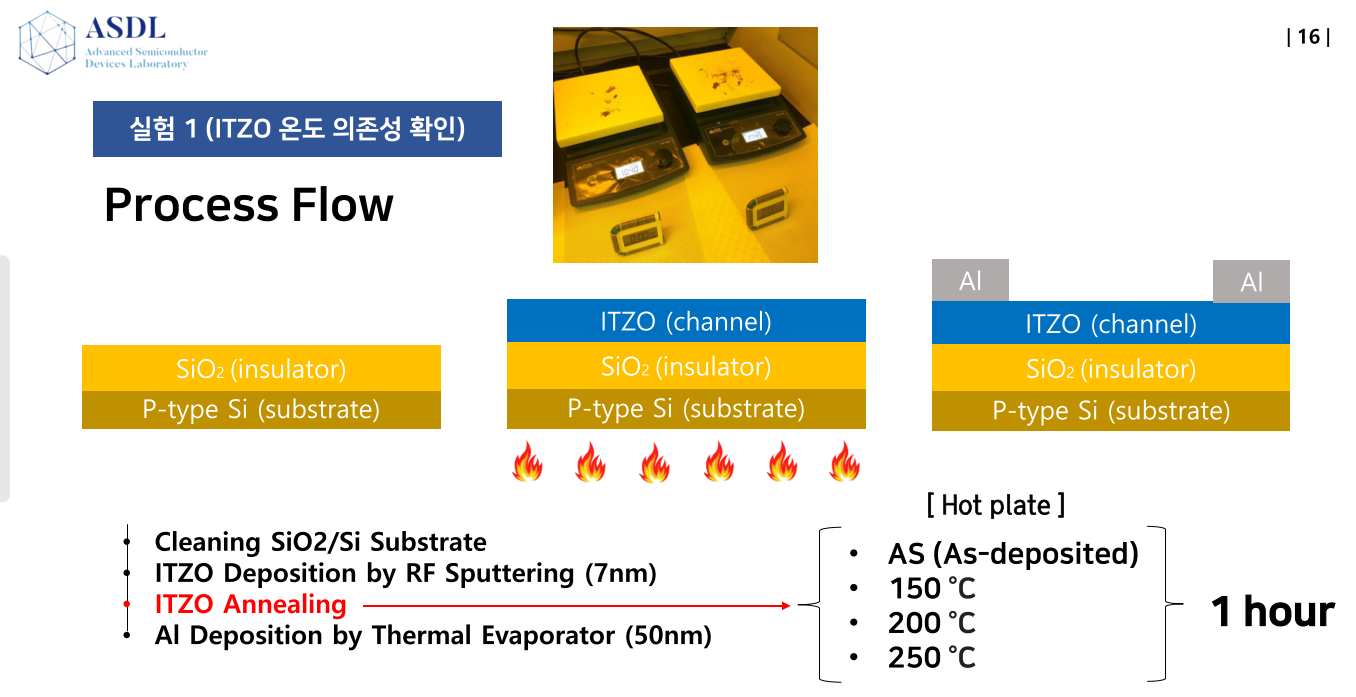
Hot plate : AS, 150°C, 200°C, 250°C
1. Motivation
ITZO (In-Sn-Zn-O) has higher mobility than IGZO.
In addition, an efficient orbital overlapping chip phenomenon occurs in the 5s orbital of n3+ and Sn4+, making it easy to move electrons.
Annelling has an effect on ITZO in the process.
- The annealing process increases the electrical properties and stability of the TFT thin film. It also increases oxygen vacancy removal, M-O bond formation, and charge carrier generation.
- Oxygen in the chamber is diffused into the empty space of the channel to reduce the empty space of oxygen and increase the interface trap between a-ITZO/SiO2. Thus, I will grasp the characteristics of ITZO according to Annelling.
Conditions - Hot plate (AS, 150°C, 200°C, 250°C) [1 hour]
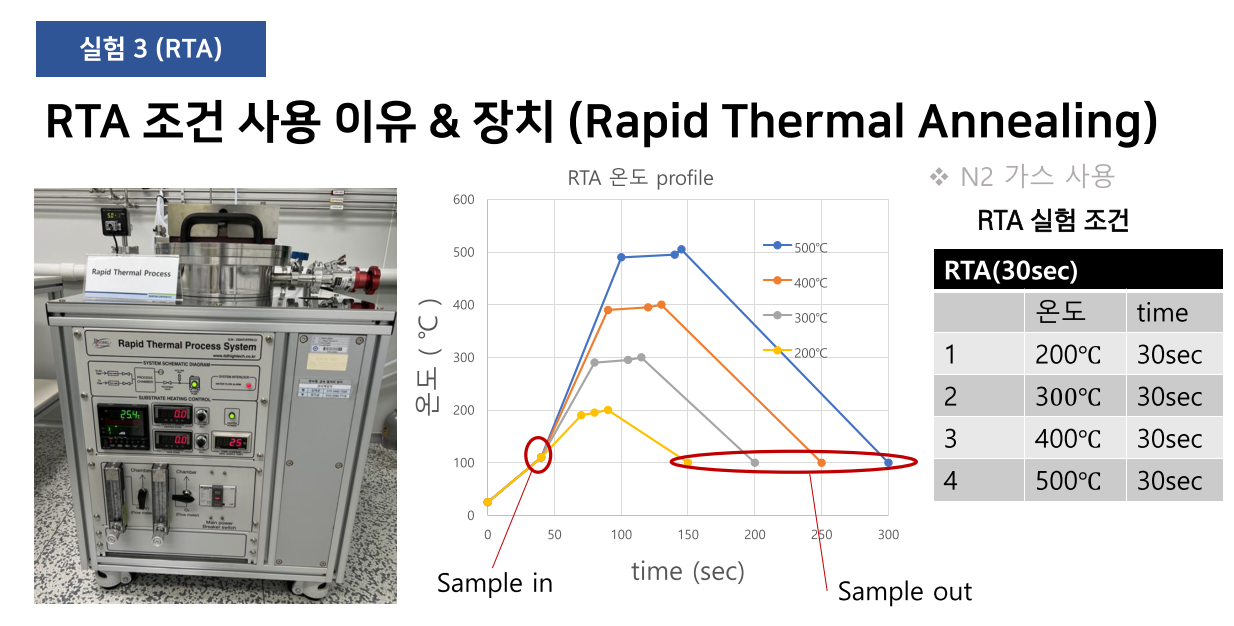
- RTA (AS, 200°C, 300°C, 400°C, 500°C) [30 second]
Announcement day : 2021-12-01
2. Introduction of team members
3. Progress & Results
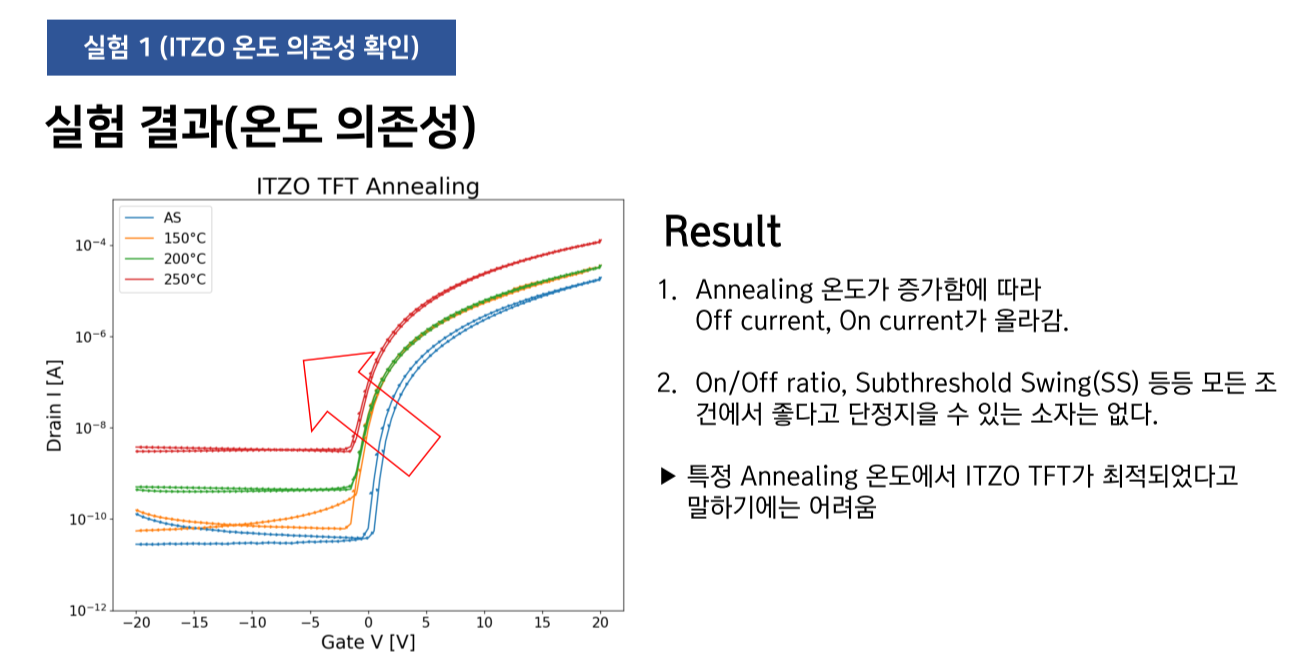
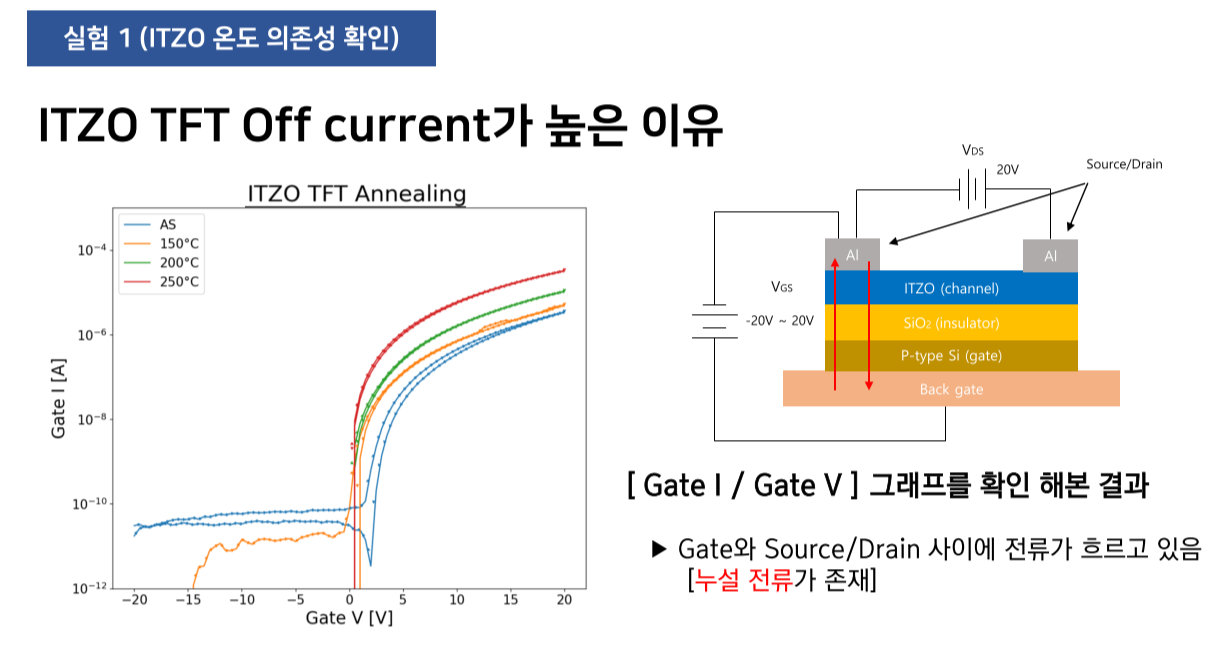
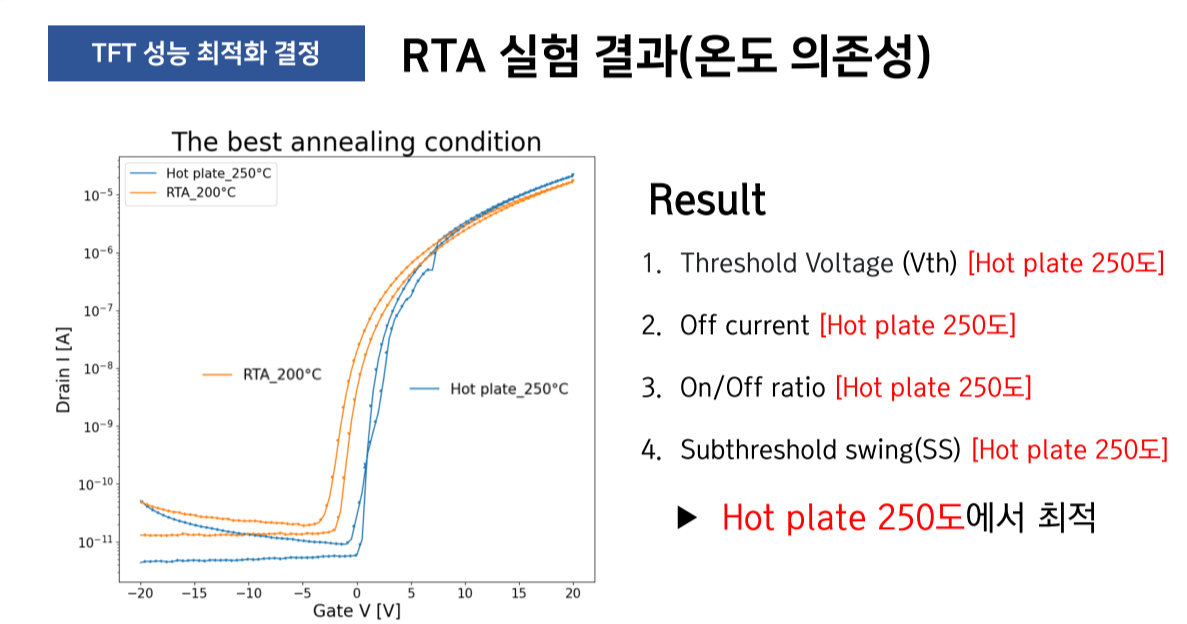
[Experiment 1] Determine the temperature dependence of ITZO
![Image]()
![Image]()
Problem Occurred![Image]()
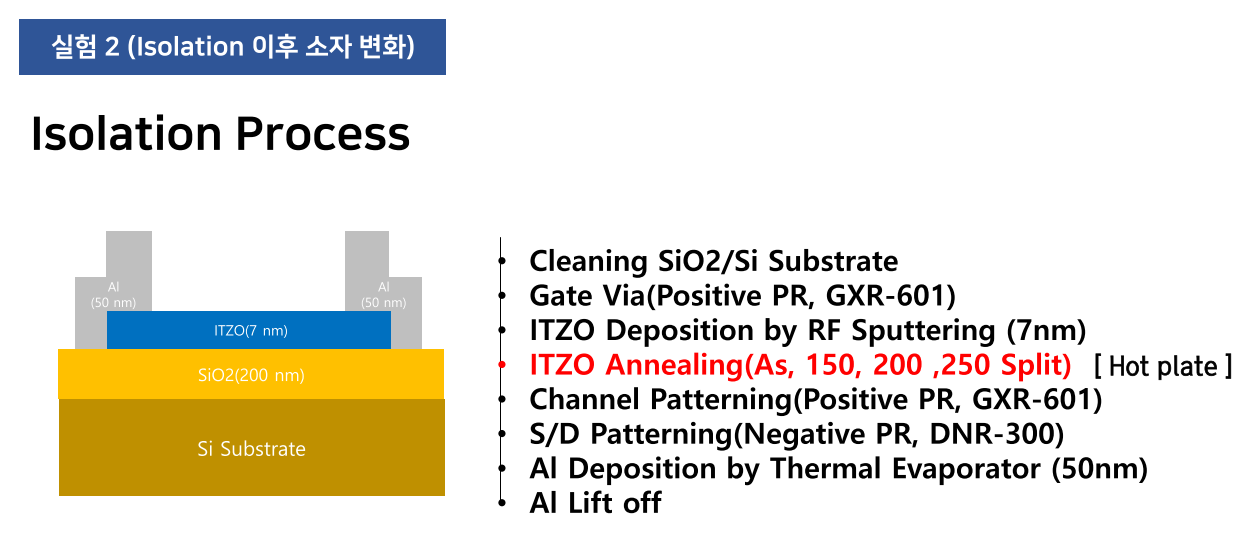
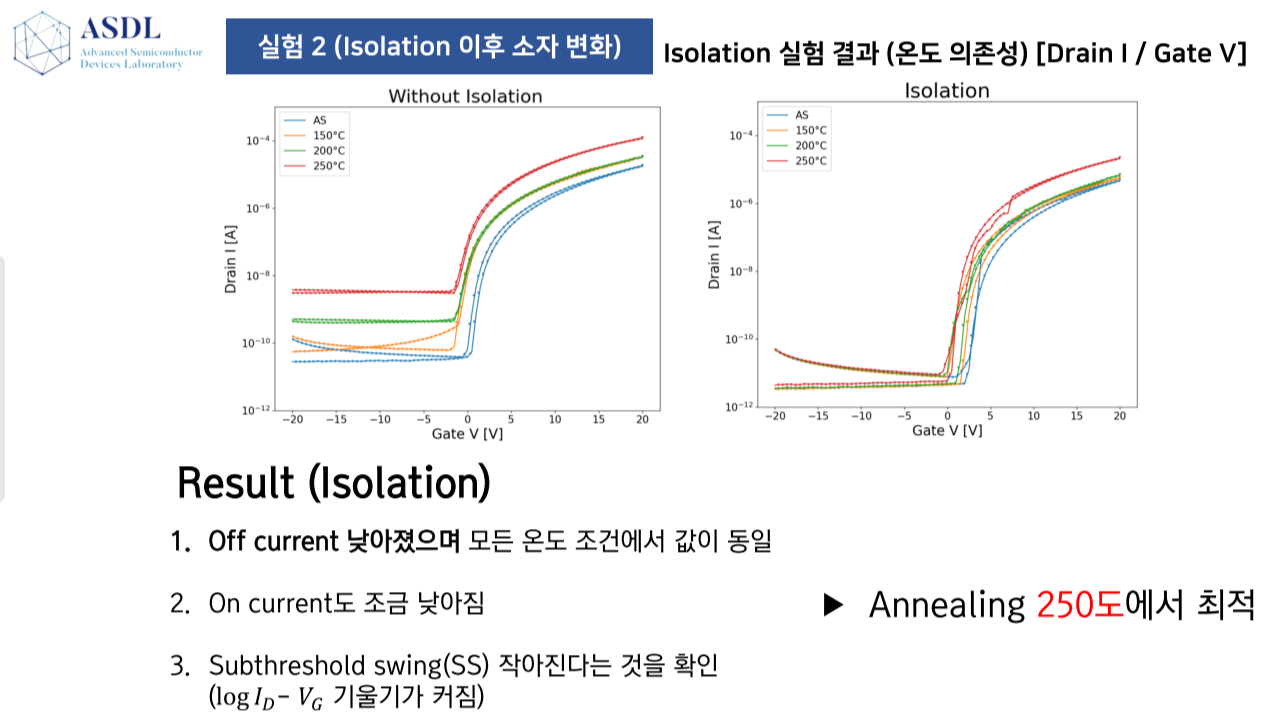
[Experiment 2] Changes in the device after isolation
![Image]()
Solution![Image]()
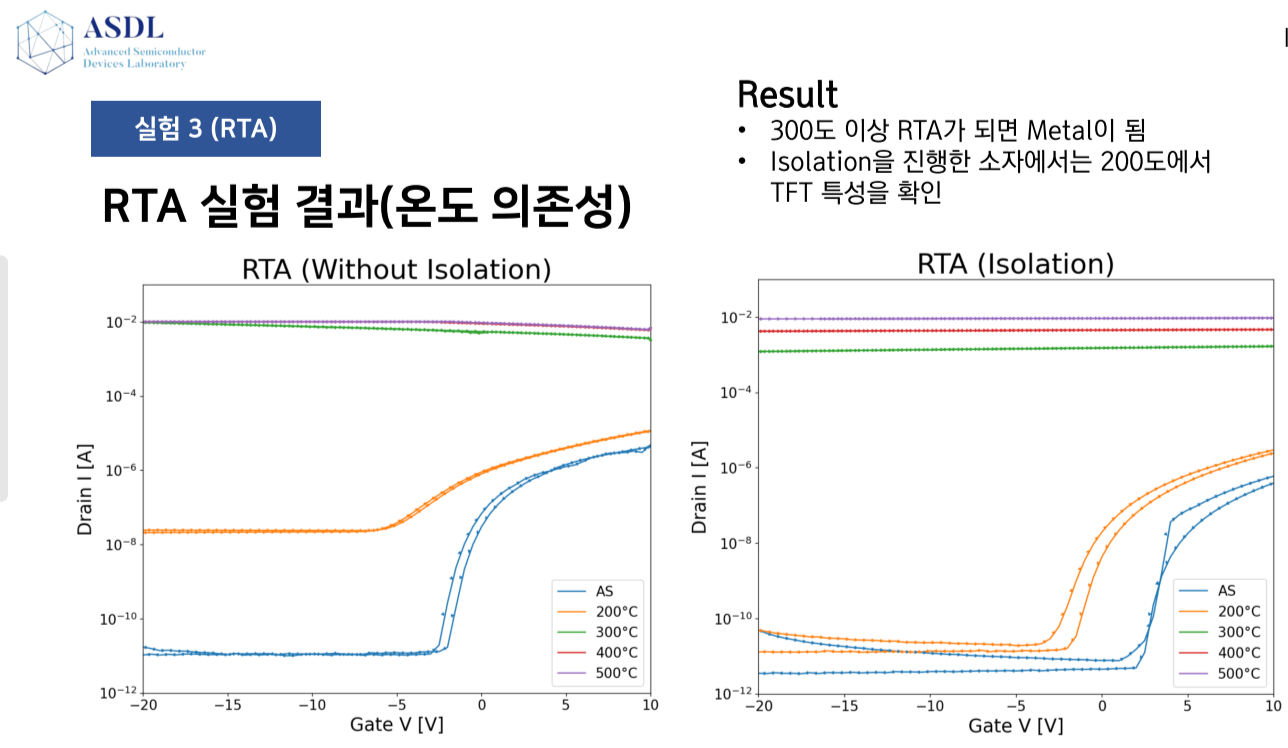
[Experiment 3] RTA
![Image]()
![Image]()
Conclusion
![Image]()
4. The final conclusion
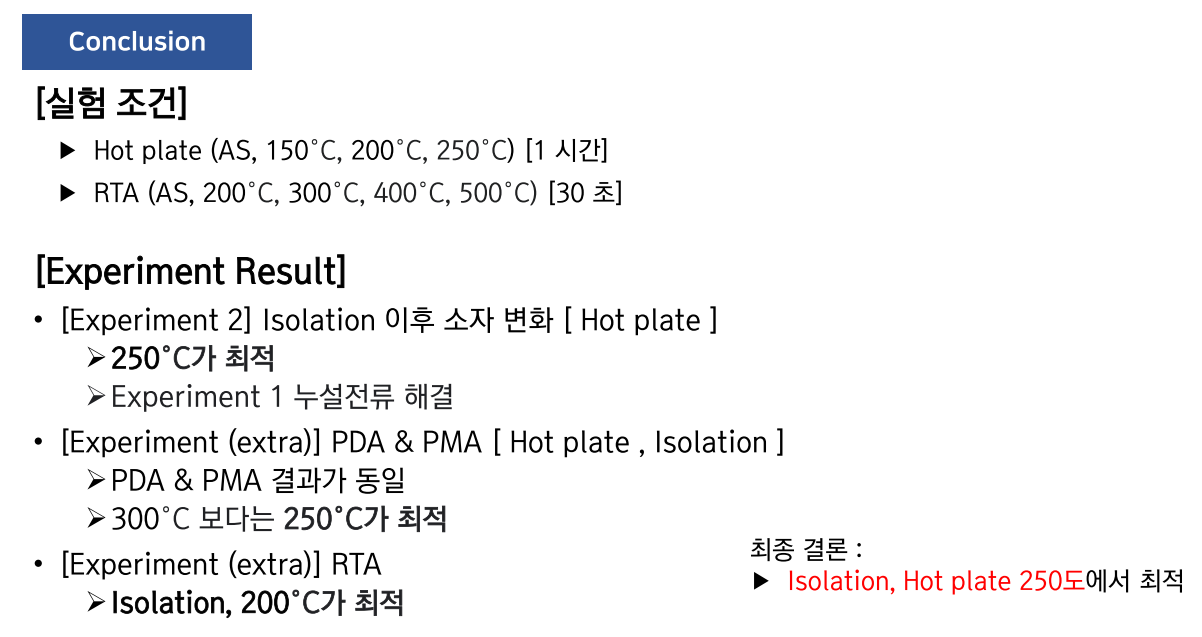
5. Reference
[1] Junghwan Kim, Hoichang Yang& Jae Kyeong Jeong(2020.October.1). Nature research
[2] Youngjoon Choi, Saeroonter Choi and Jaekyun Kim(2020. September. 29). Semicomductor Science and Technology
Read less
.jpg)
Check TFT performance (~ 2021-10-06)
TFT[Thin File Transistor] Properties according to TFT Width, Length
1. Motivation
The voltage-current relationship of TFT(Thin File Transistor) is as follows.

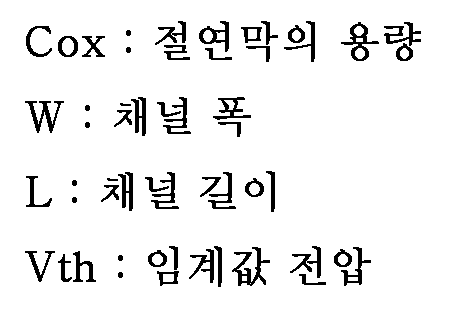
Therefore, an experiment was conducted to check whether the properties of TFTs change according to changes in W and L.
2. Introduction of team members
3. Process
Use the following TFTs:
2.png)
The Mask that will shape the Metal
3.png)
4. Conclusion
- Result of Width change!
![Image]()
- Result of Length change!
![Image]()
Read less
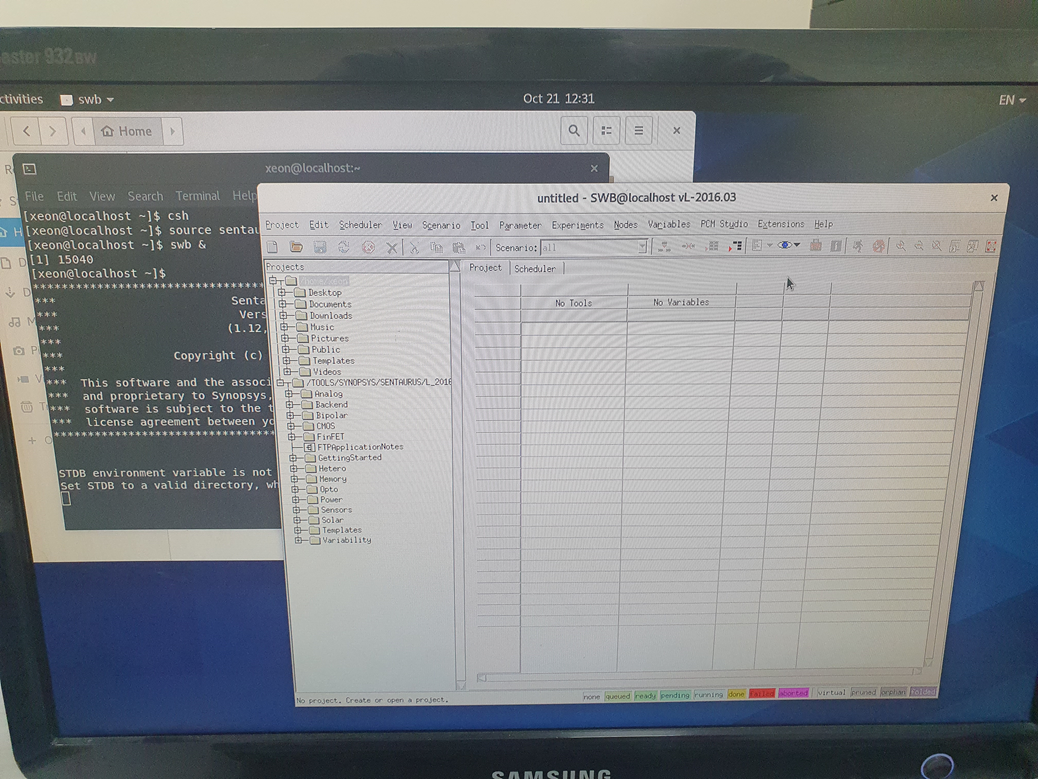
TCAD Sentaurus Download and Execution Process (~ 2021-11-12)
Linux CenOS8 version, Semiconductor Simulation TCAD Sentaurus
1. What is TCAD Sentaurus?
Technology Computer-Aided Design (TCAD) refers to using computer simulations to develop and optimize semiconductor processing technologies and devices.
TCAD simulation tools solve fundamental, physical, partial differential equations, such as diffusion and transport equations for discretized geometries, representing the silicon wafer or the layer system in a semiconductor device.
This deep physical approach gives TCAD simulation predictive accuracy.
Therefore, it is possible to substitute TCAD computer simulations for costly and time-consuming test wafer runs when developing and characterizing a new semiconductor device or technology.
2. Process
I would appreciate it if you could refer to the pdf for detailed instructions. PDF
3. Result
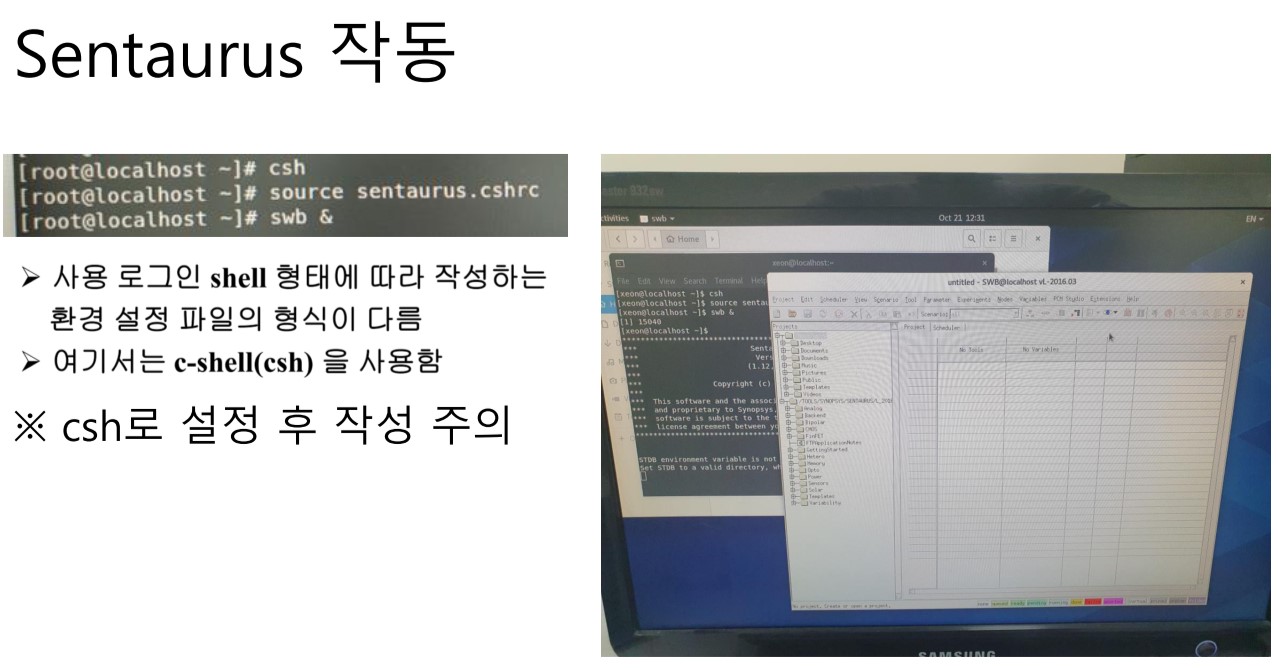
Read less
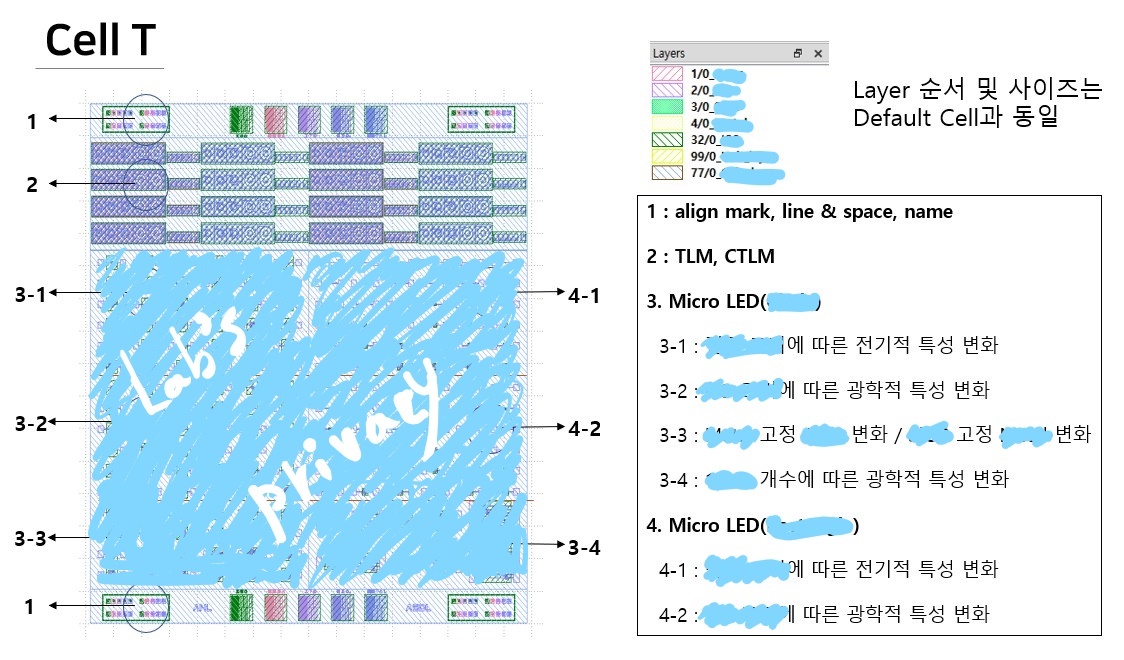
1. Introduction of team members
2. Process
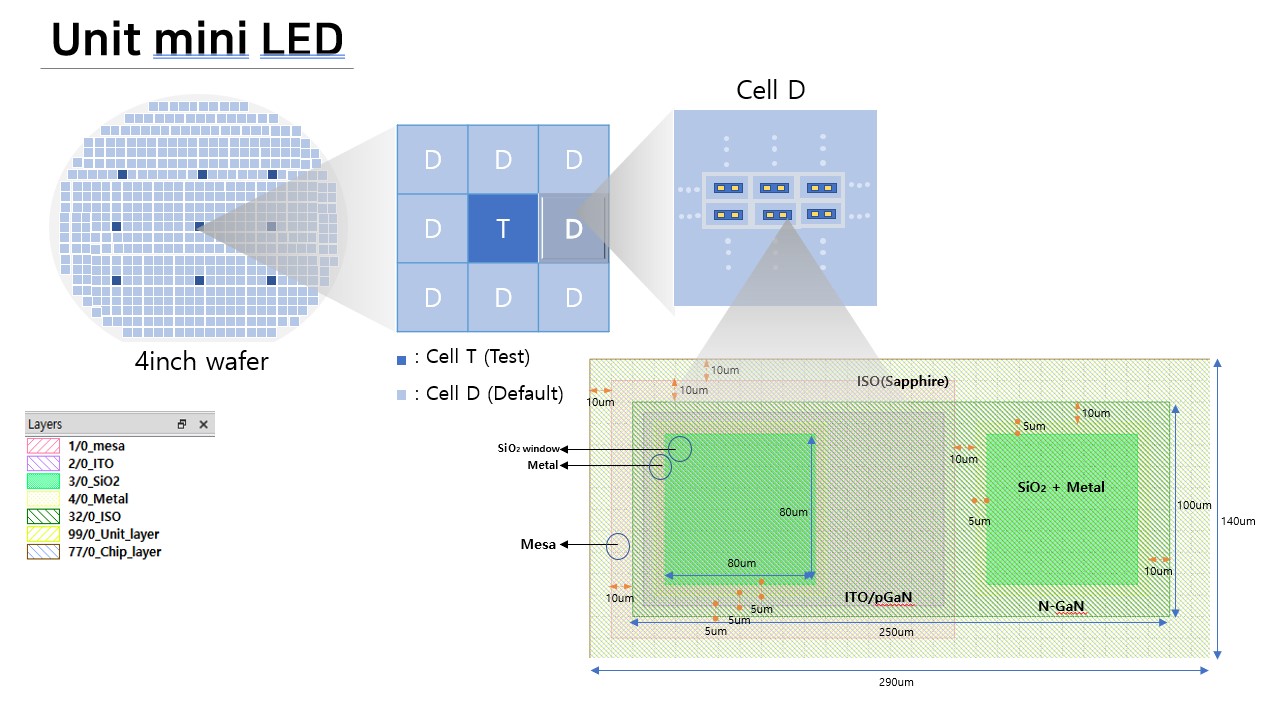
Please understand that the detailed process has a private laboratory.
Read less
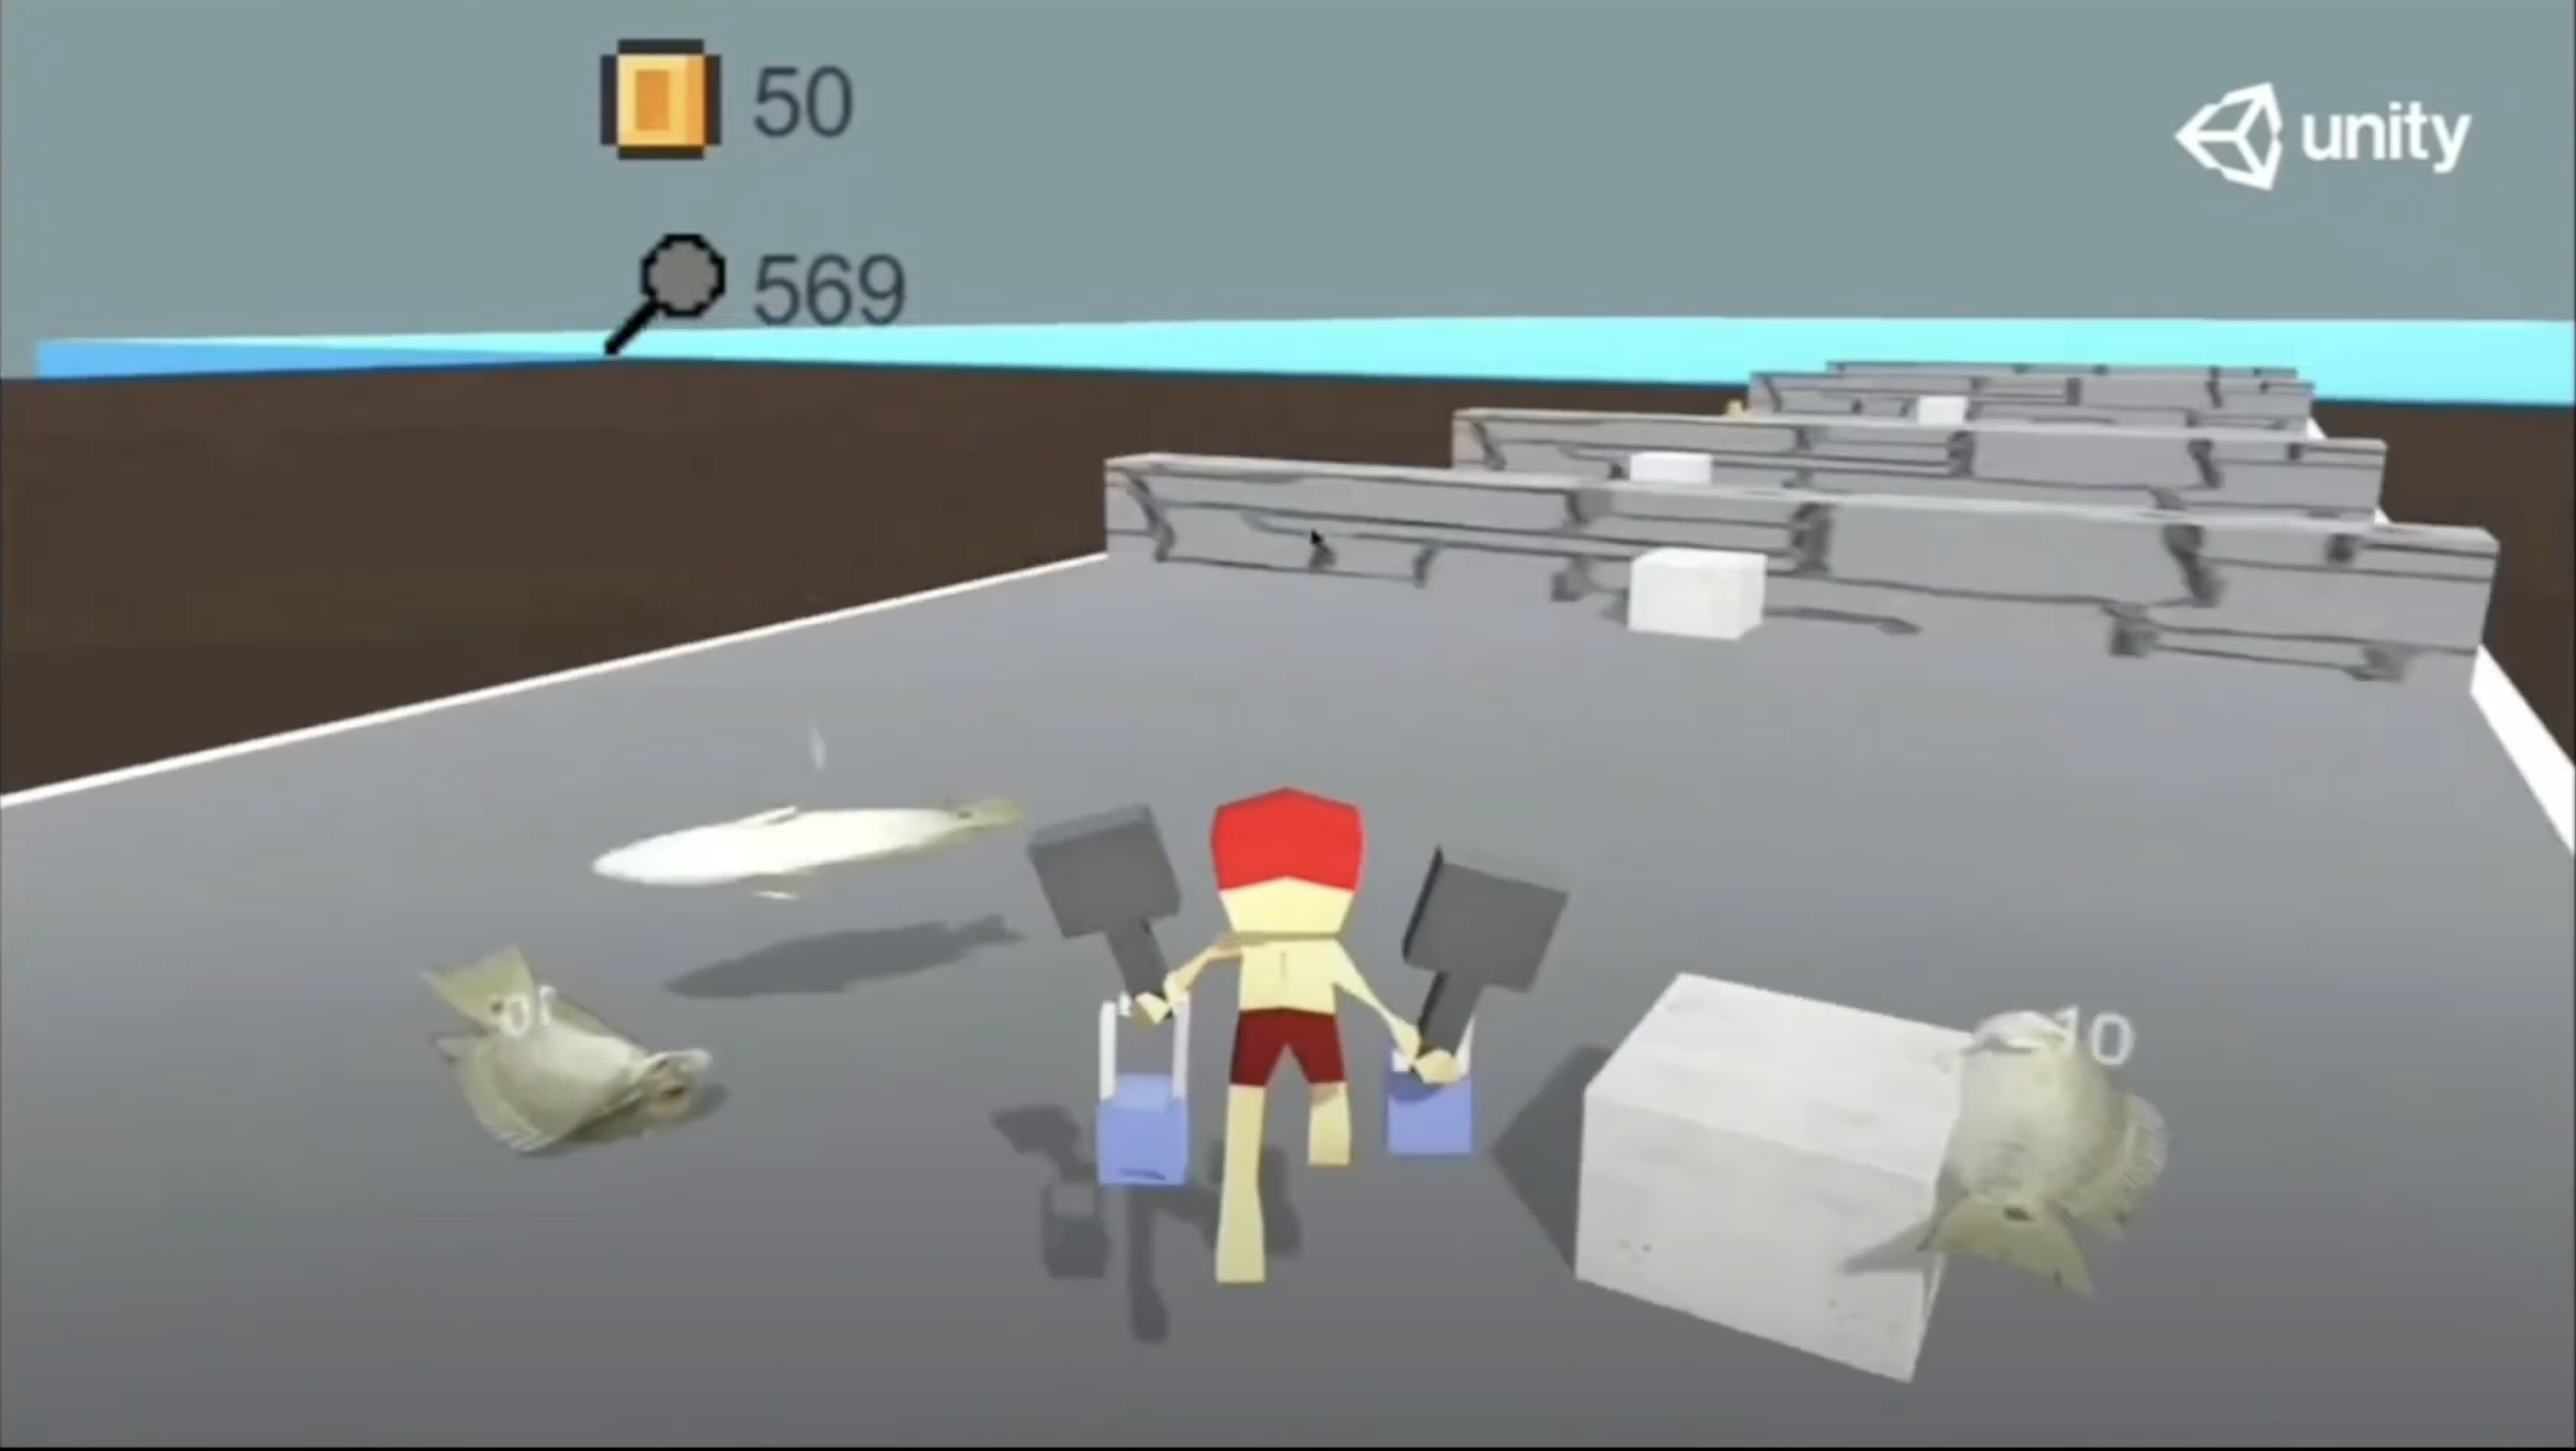
1. Explain of the contest
Competition: Overtail_GameJam
Organized by: College of computing
Period: Monday, July 18, 2022 to Wednesday, July 20, 2022 (3 Days)
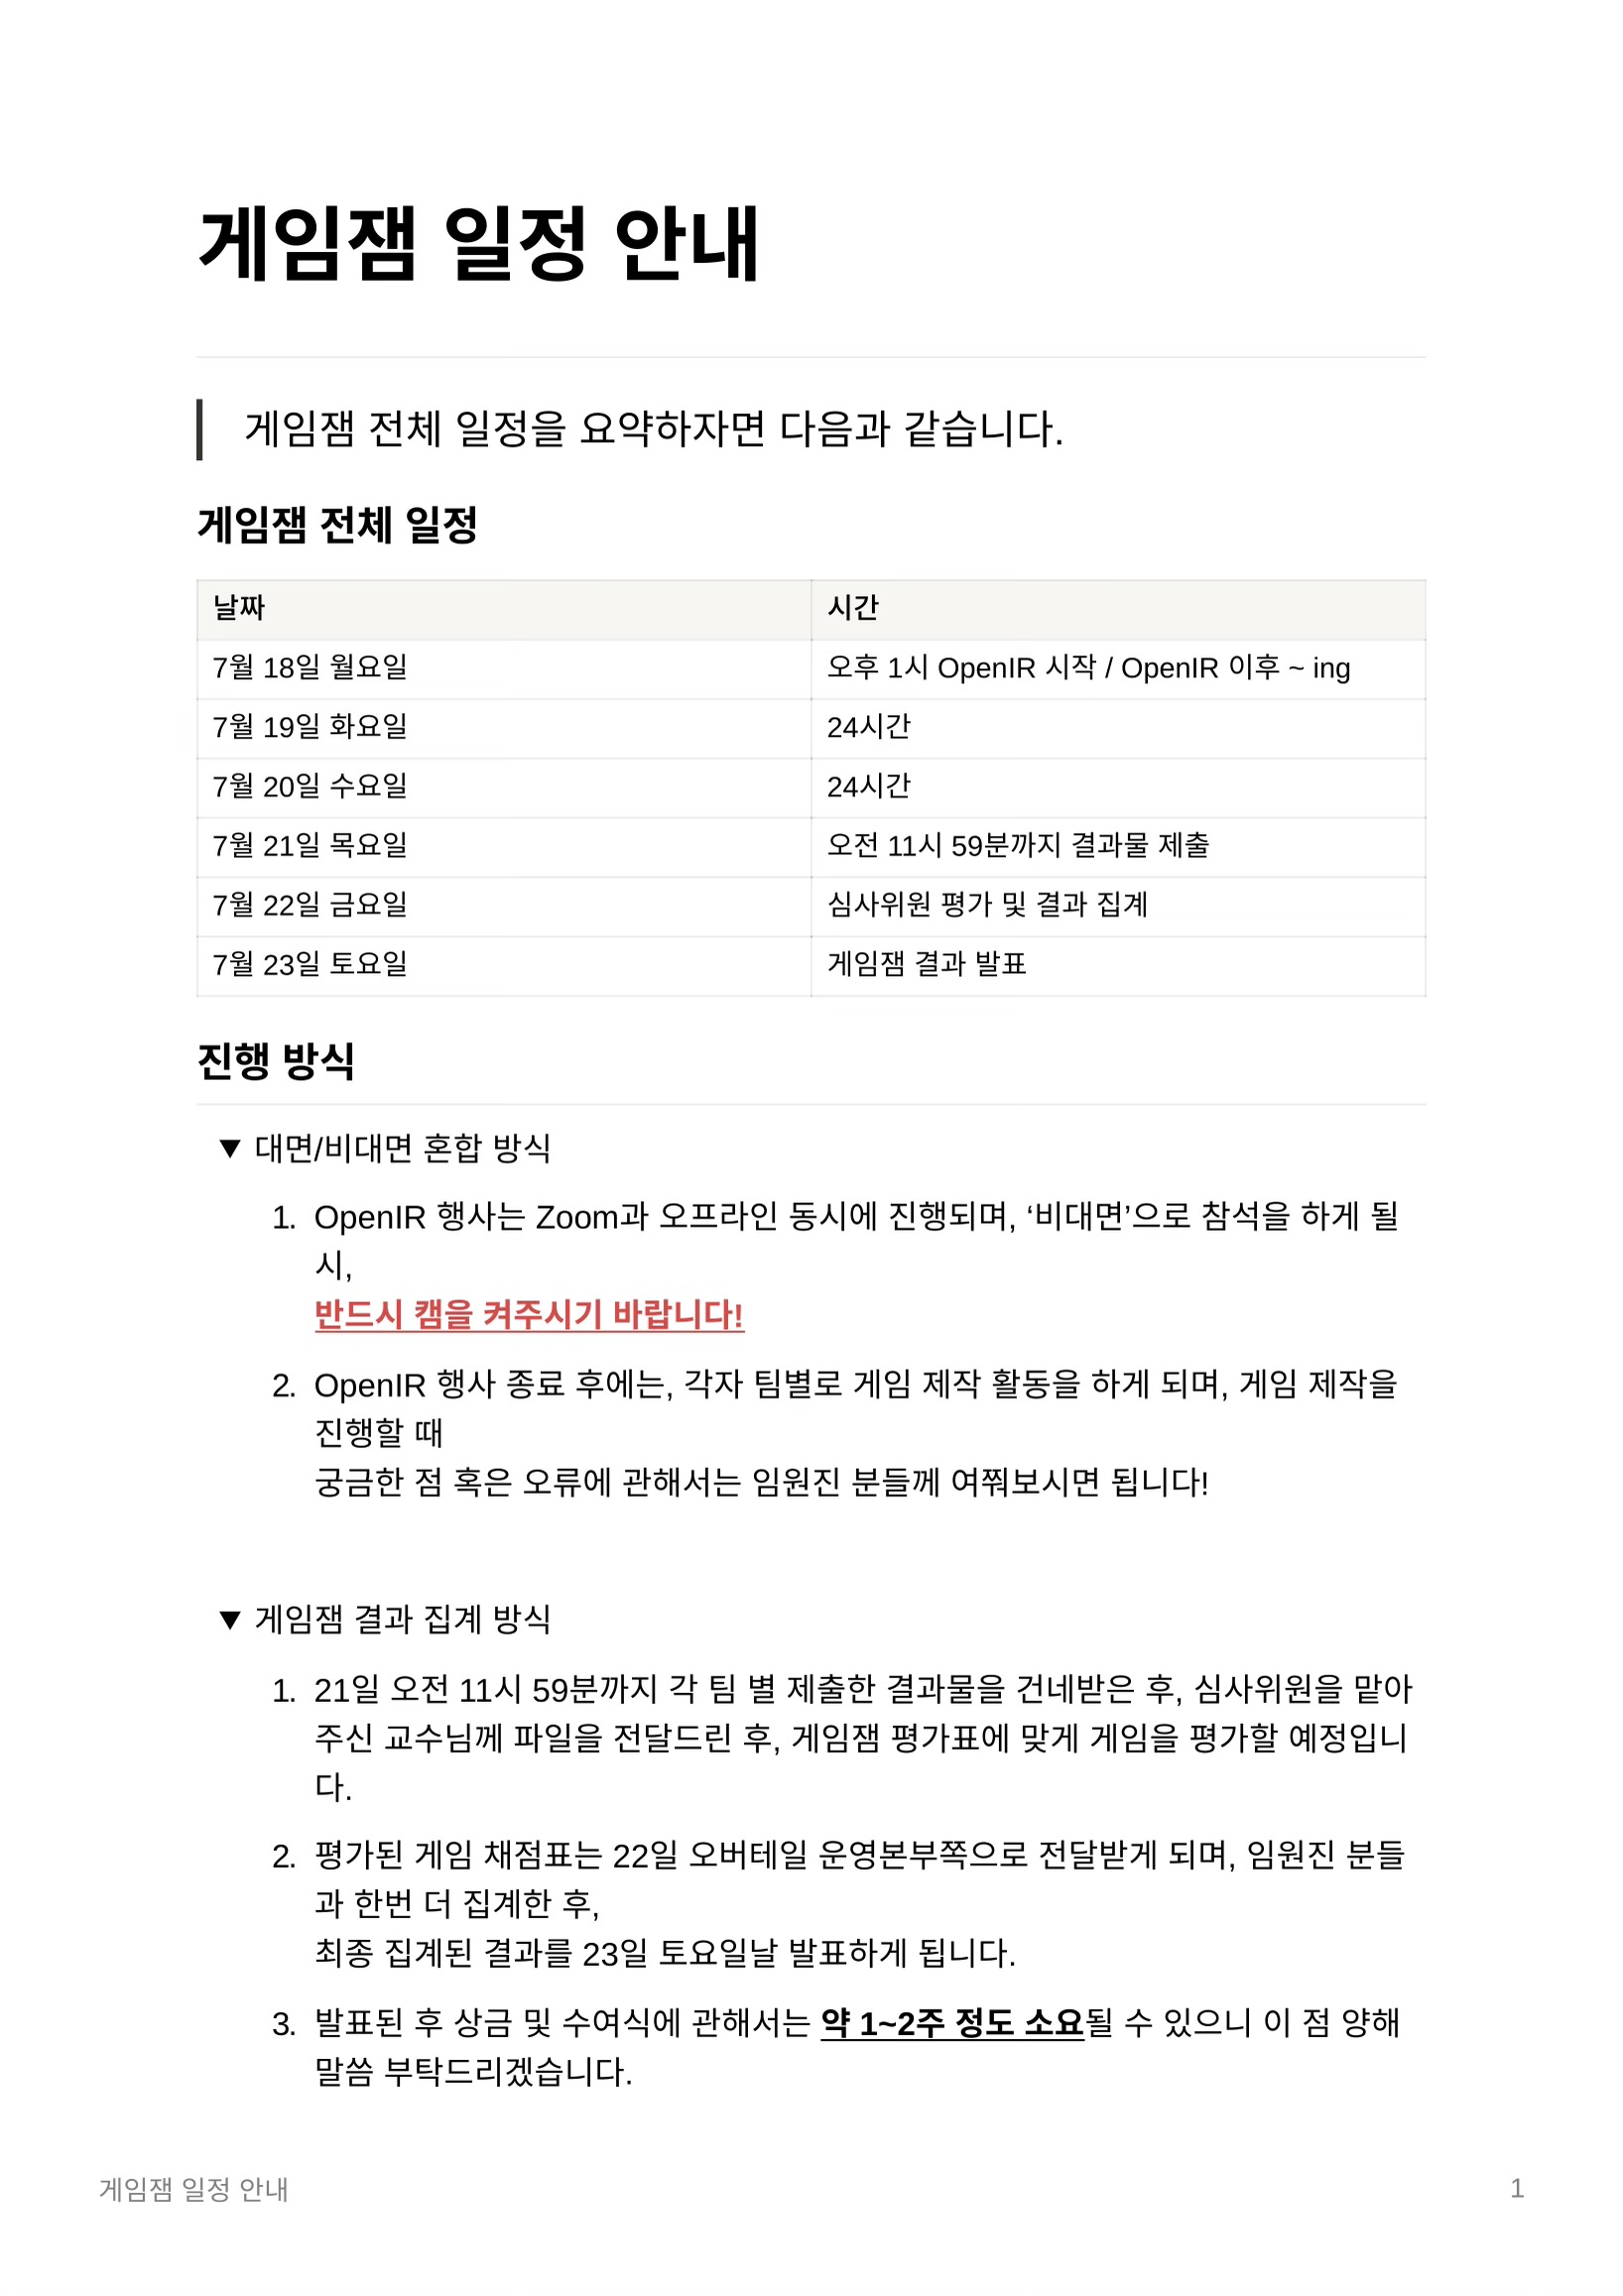
2. Introduction of team members
- Kim Taeyeop
- Kim kangseok
- Song Junsu
3. Process
Team name: NaRoHo
Keywords: water(물), heat(더위), passion(정열)
Topic: On the 18th, three words related to summer will be randomly extracted and distributed to the team. Create a game using keywords for the next 3 days
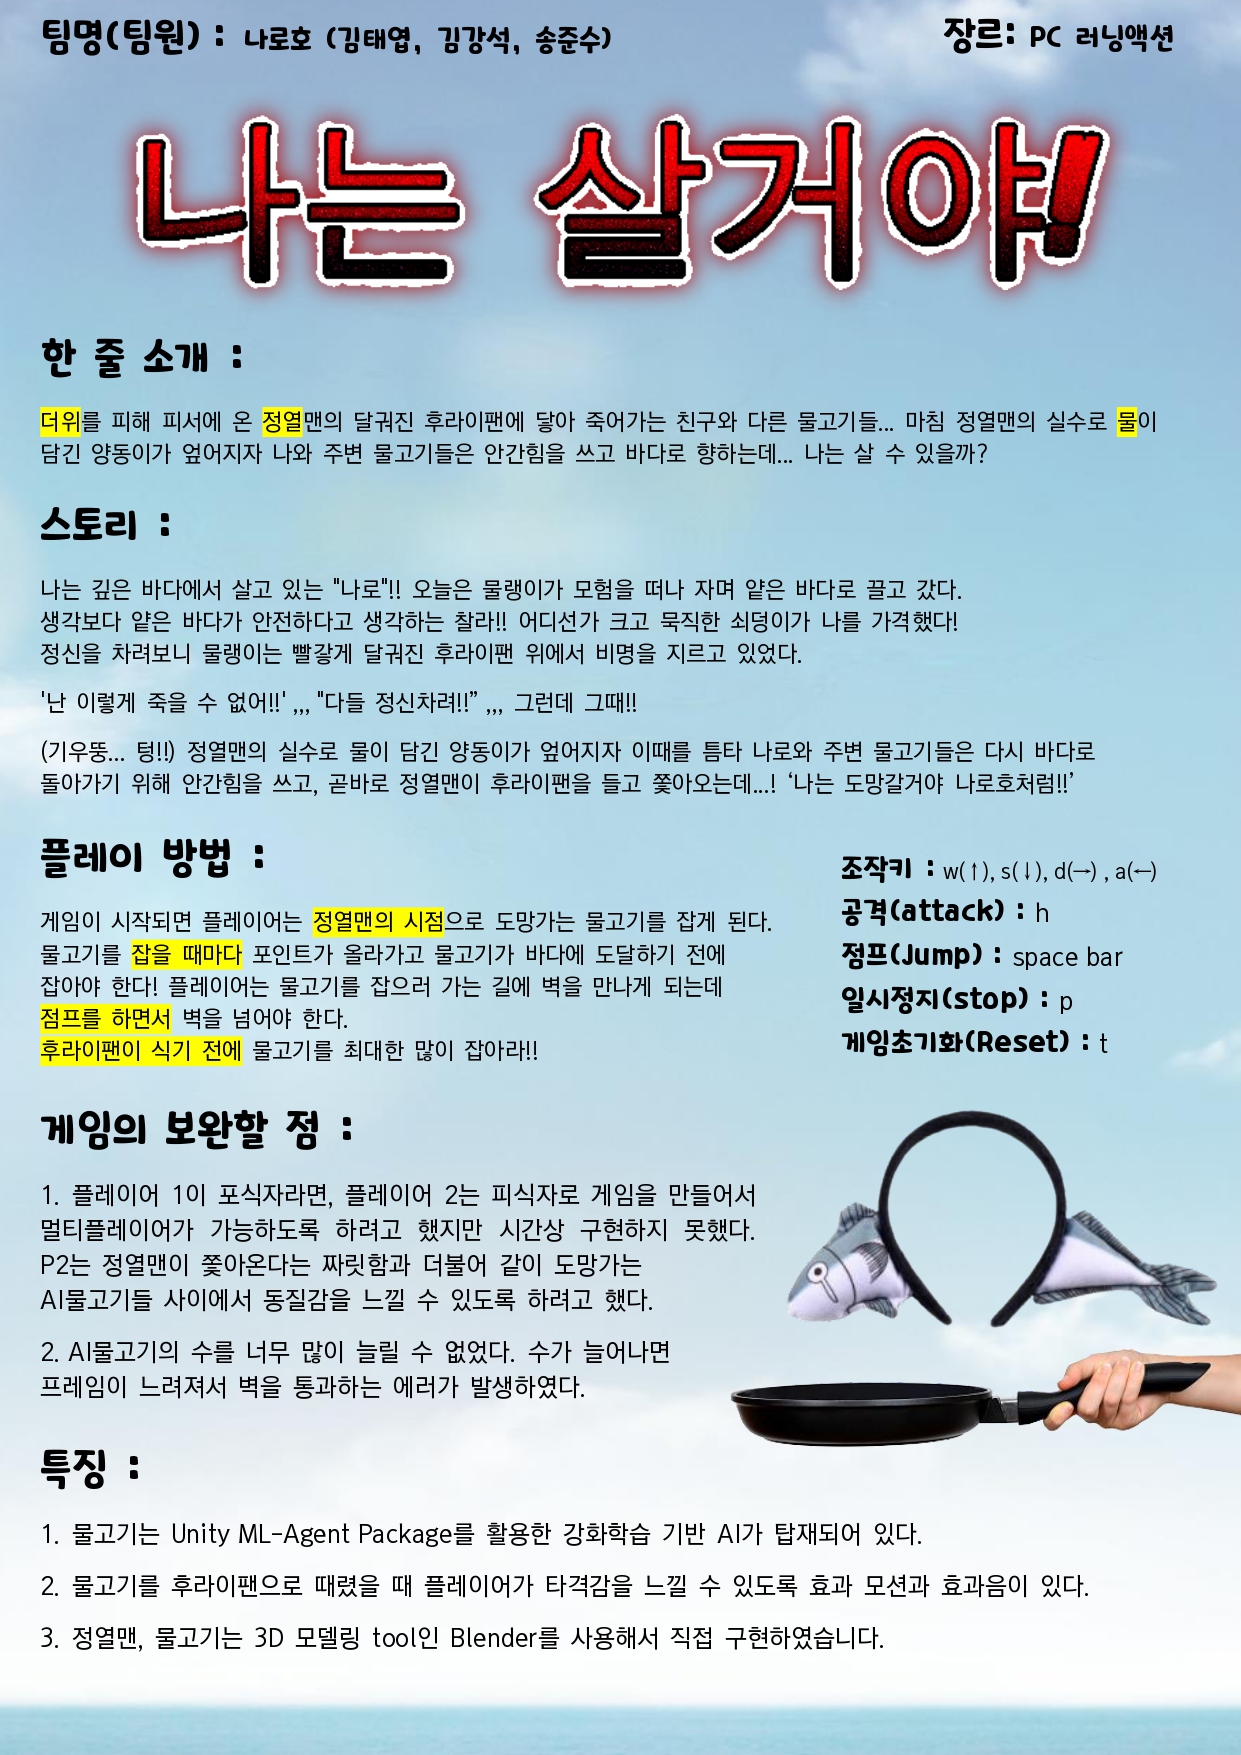
After making the game, film the video and upload it to YouTube.
4. Result
Result: 2022 Overtail Game Jam Software Dean’s Excellence Award (3rd place)
Announcement video : https://youtu.be/uRoRvXMdkAk
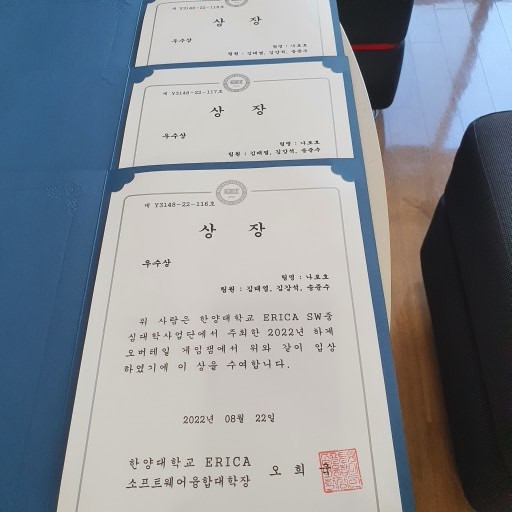
Read less
.png)
1. Explain of the contest
.png)
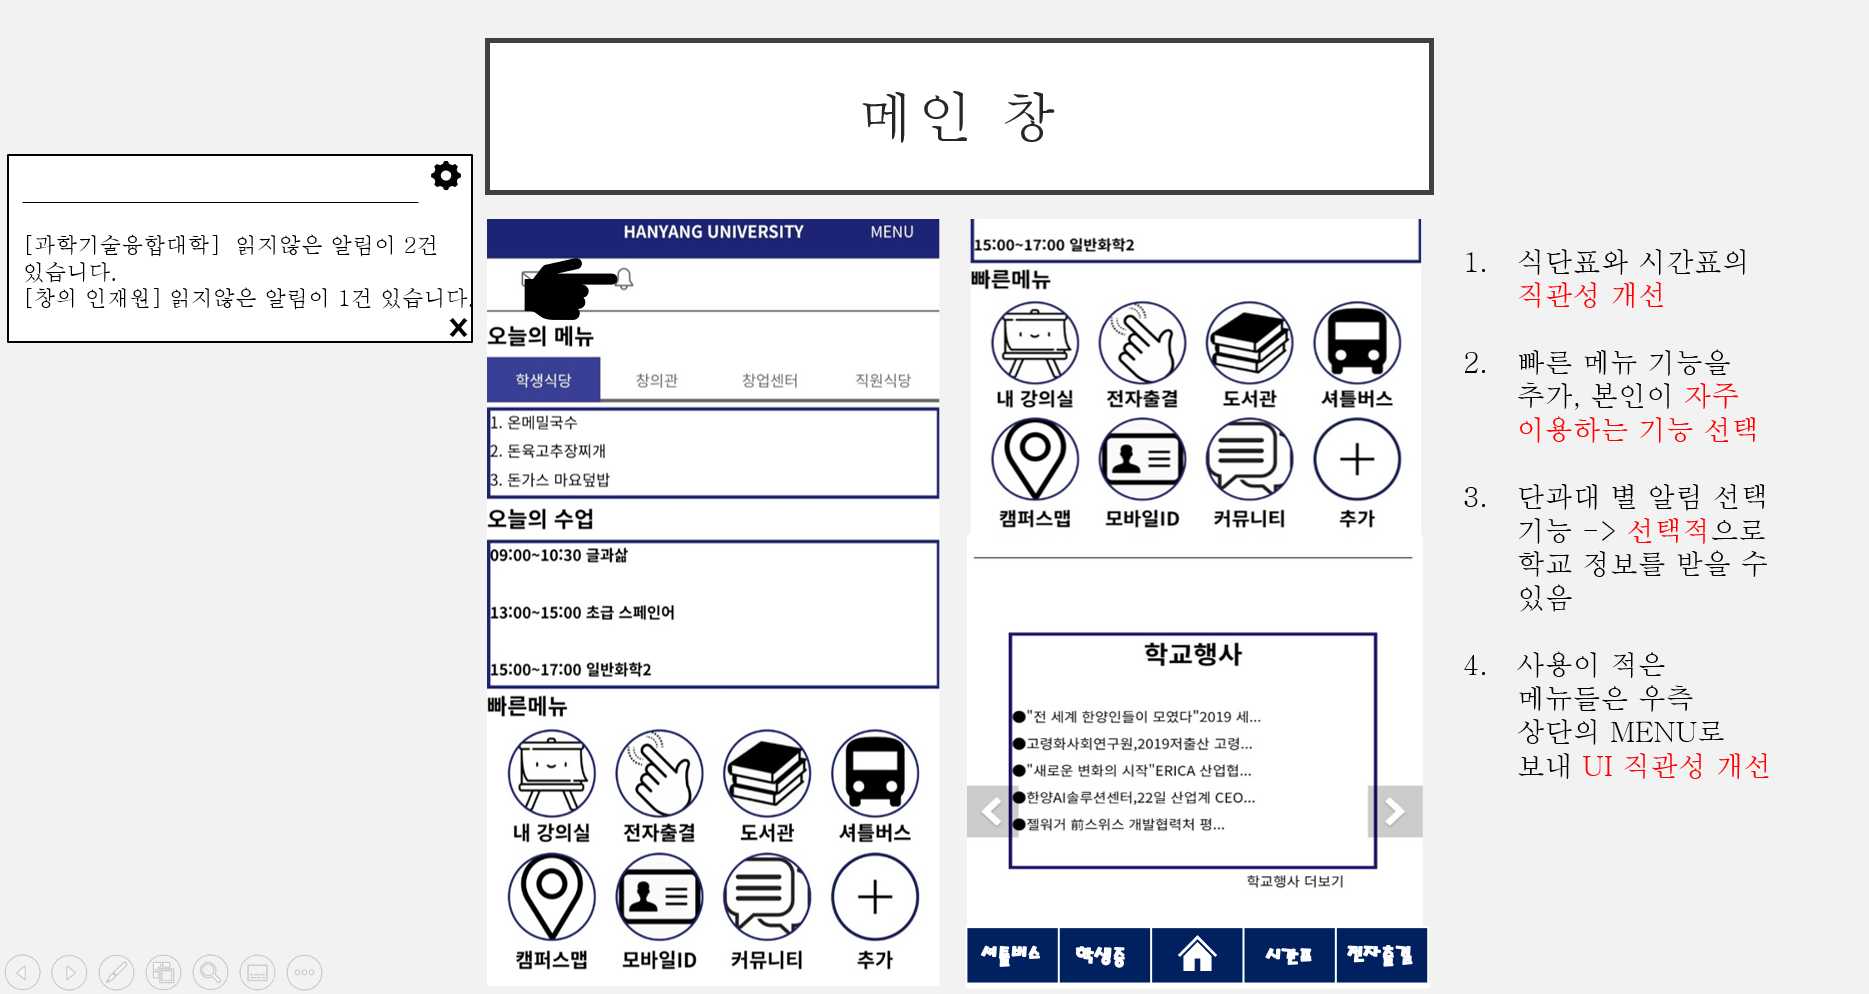
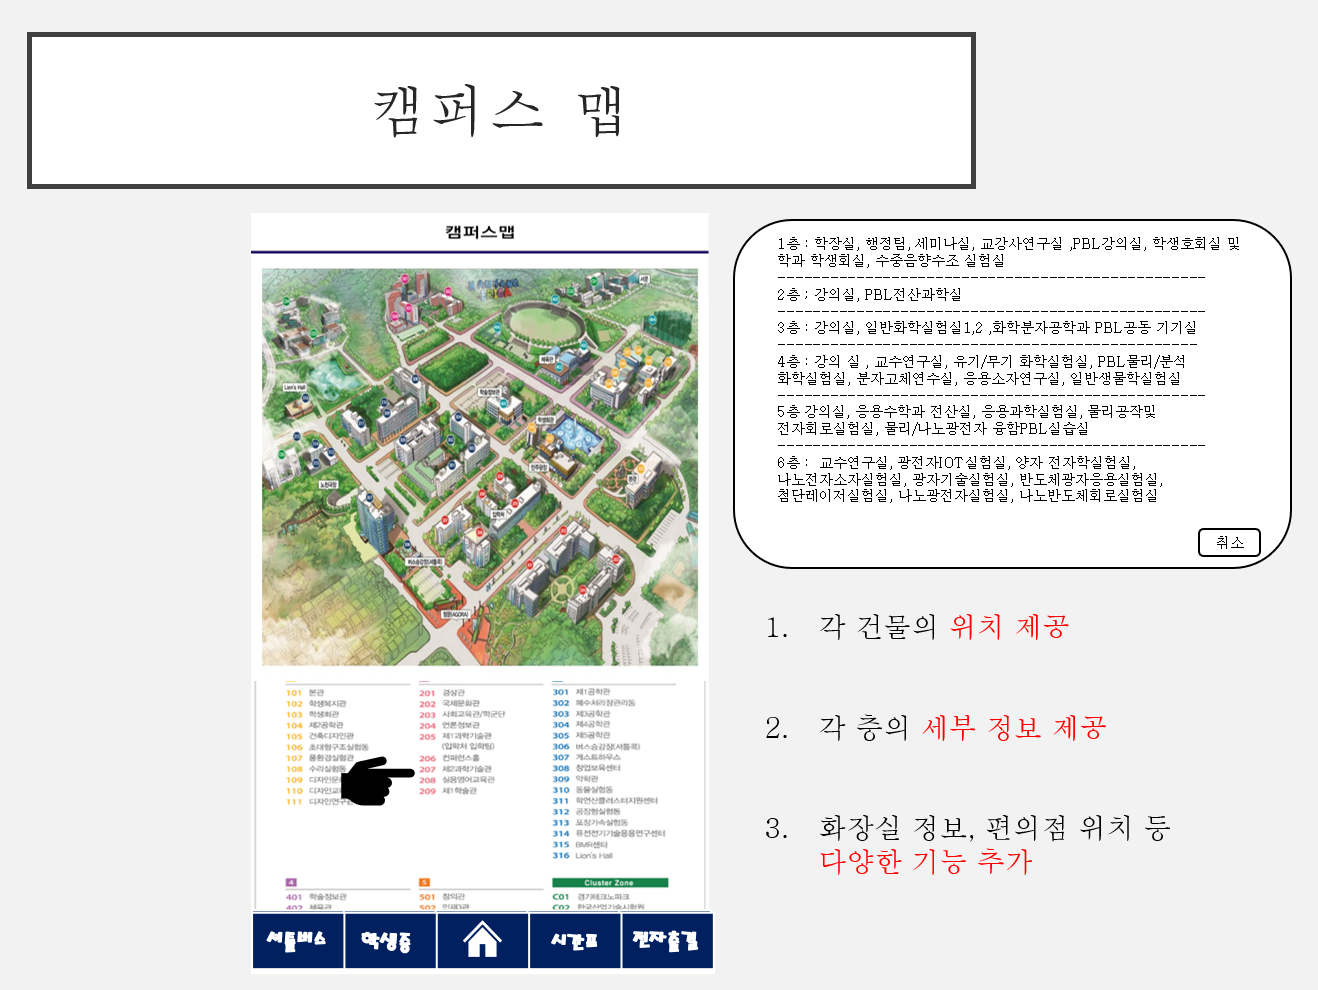
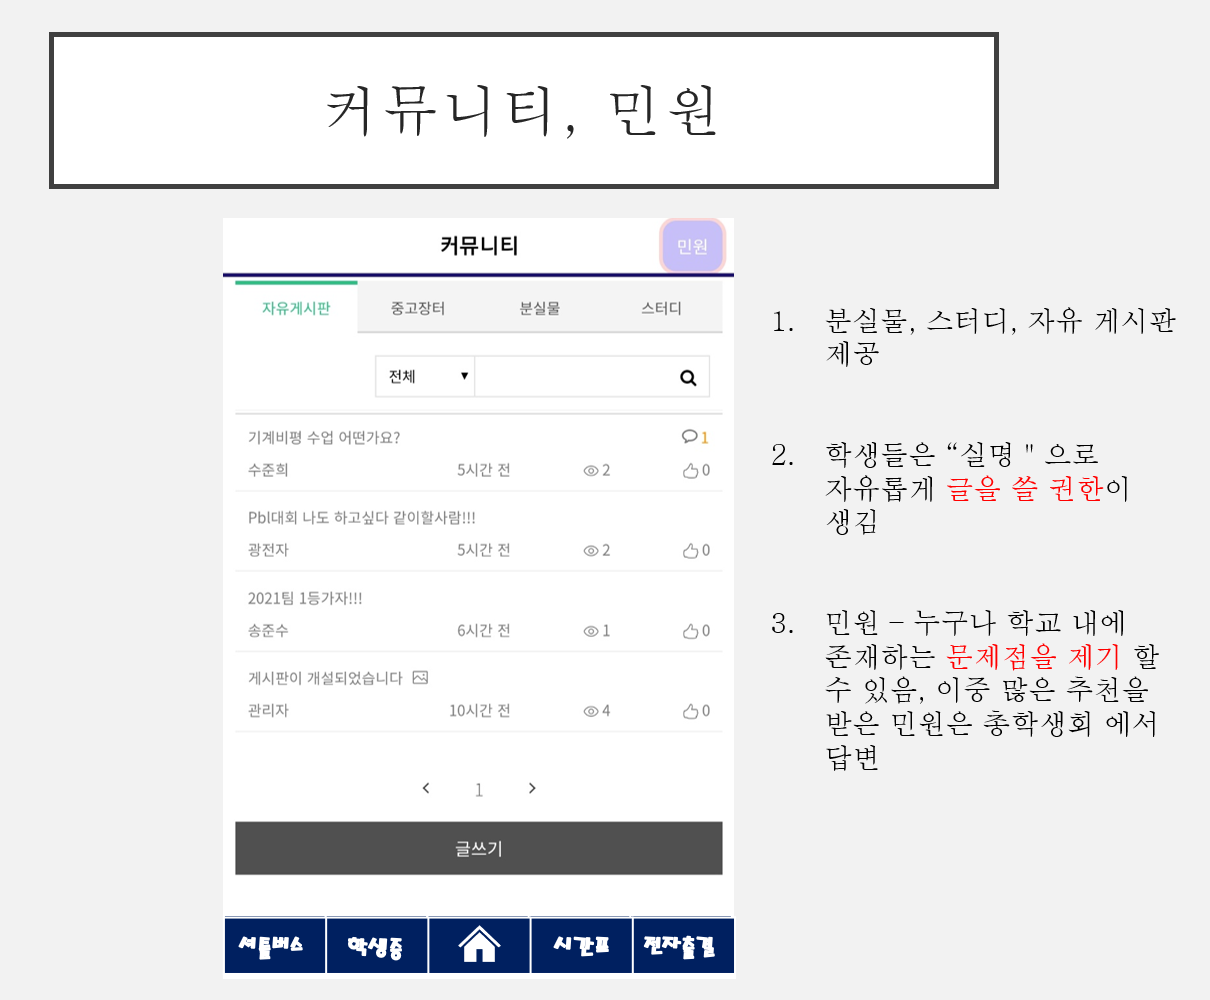
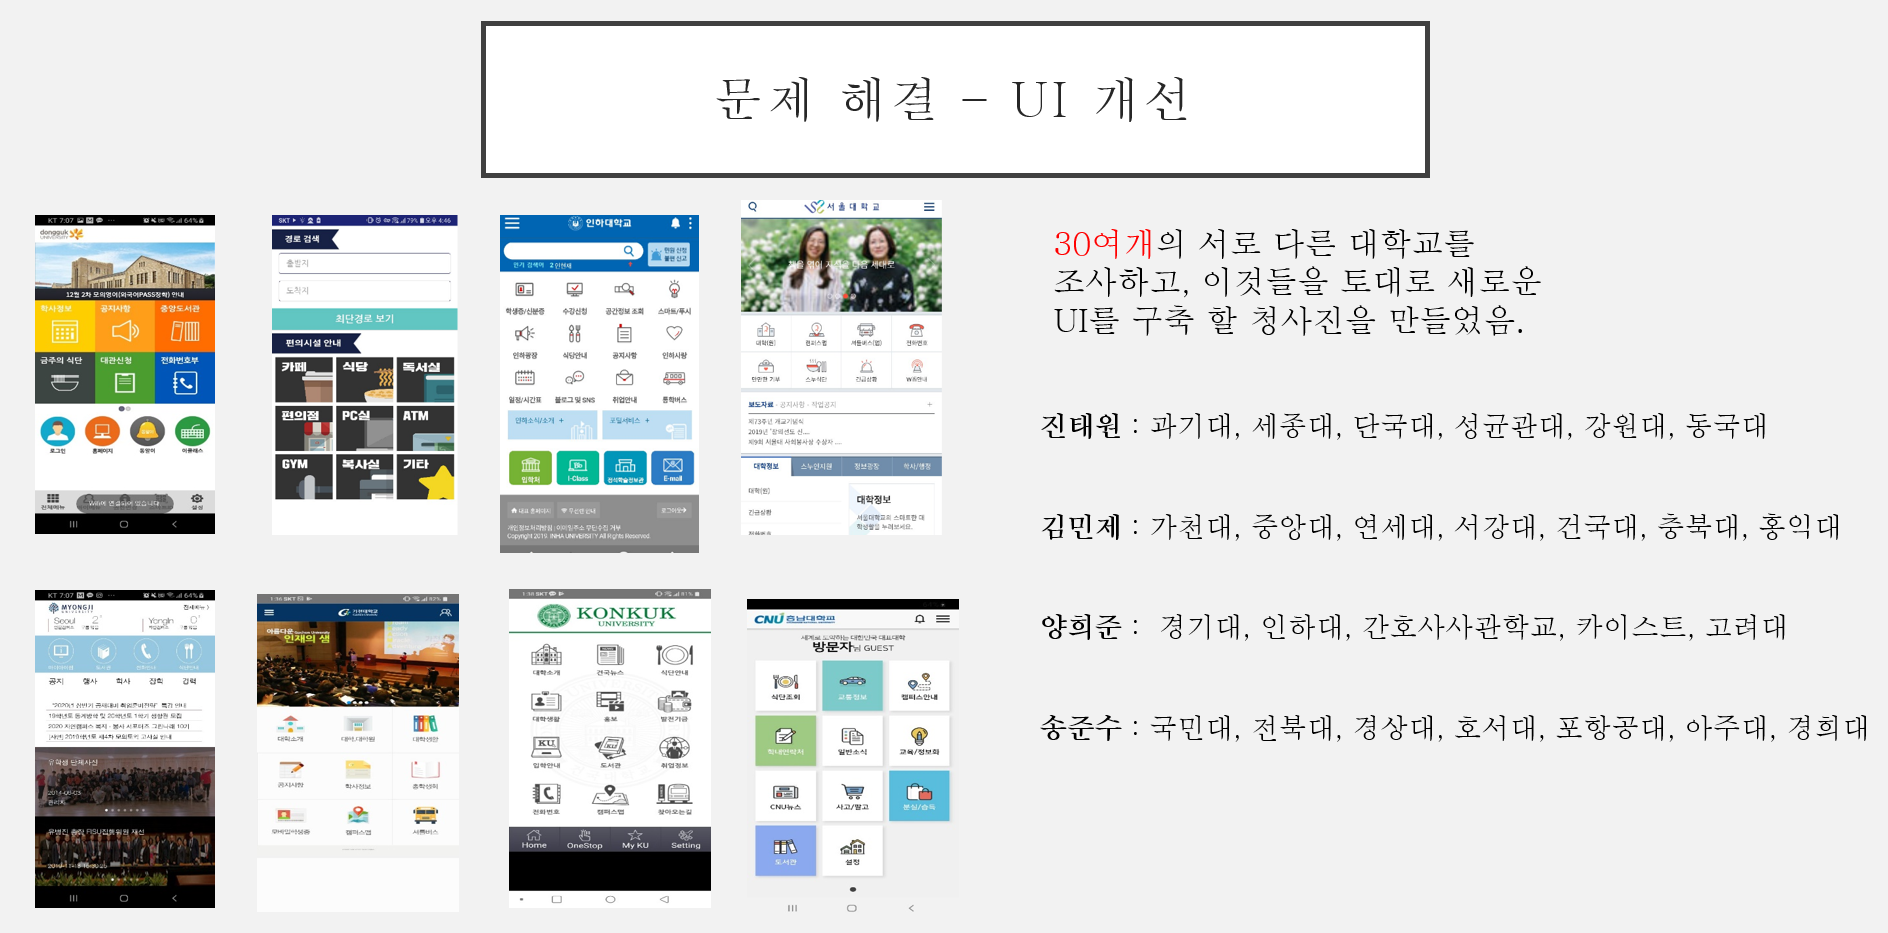
It is a contest to present ideas about what Hanyang University ERICA needs.
2. Introduction of team members
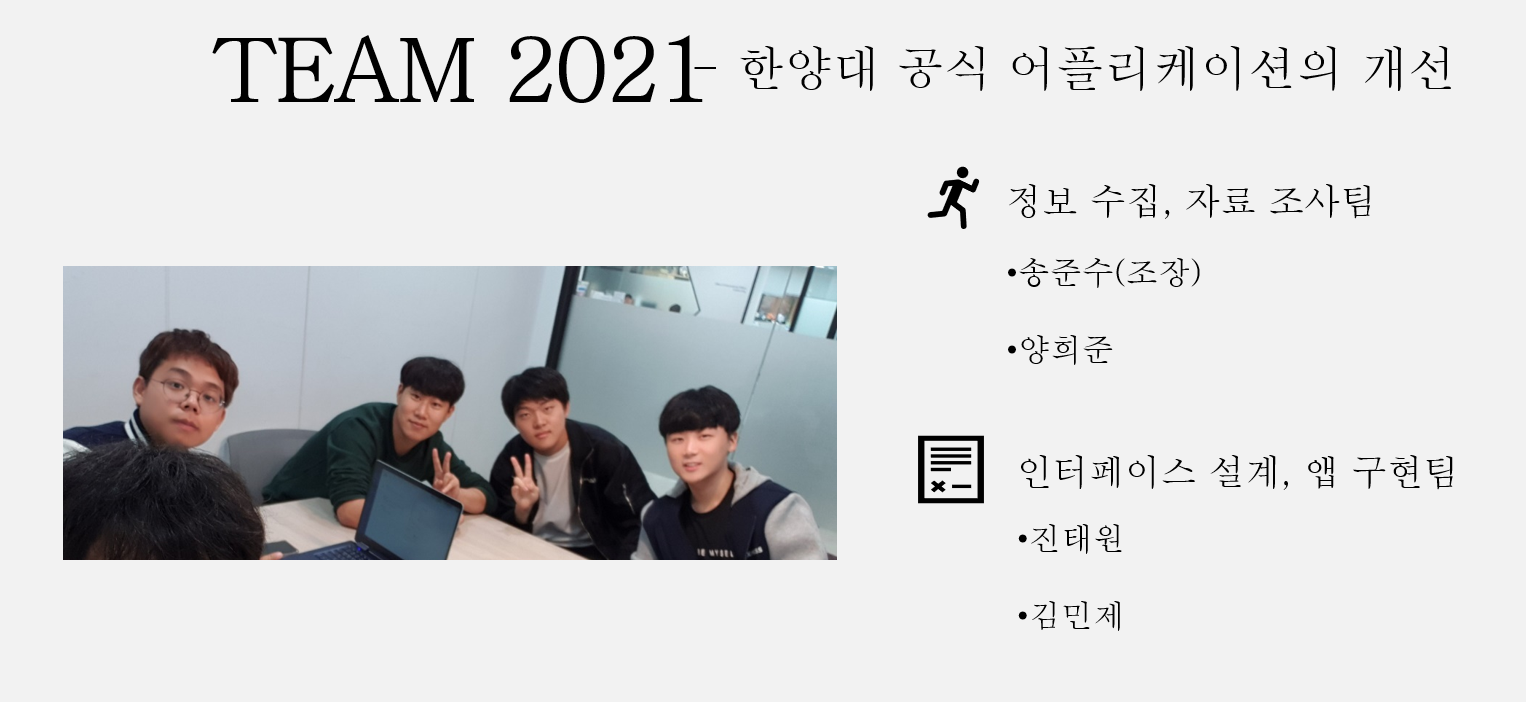
Leader: Junsu Song (ME)
Team members: Jin Taewon, Kim Minje, Yang Heejun
3. Process
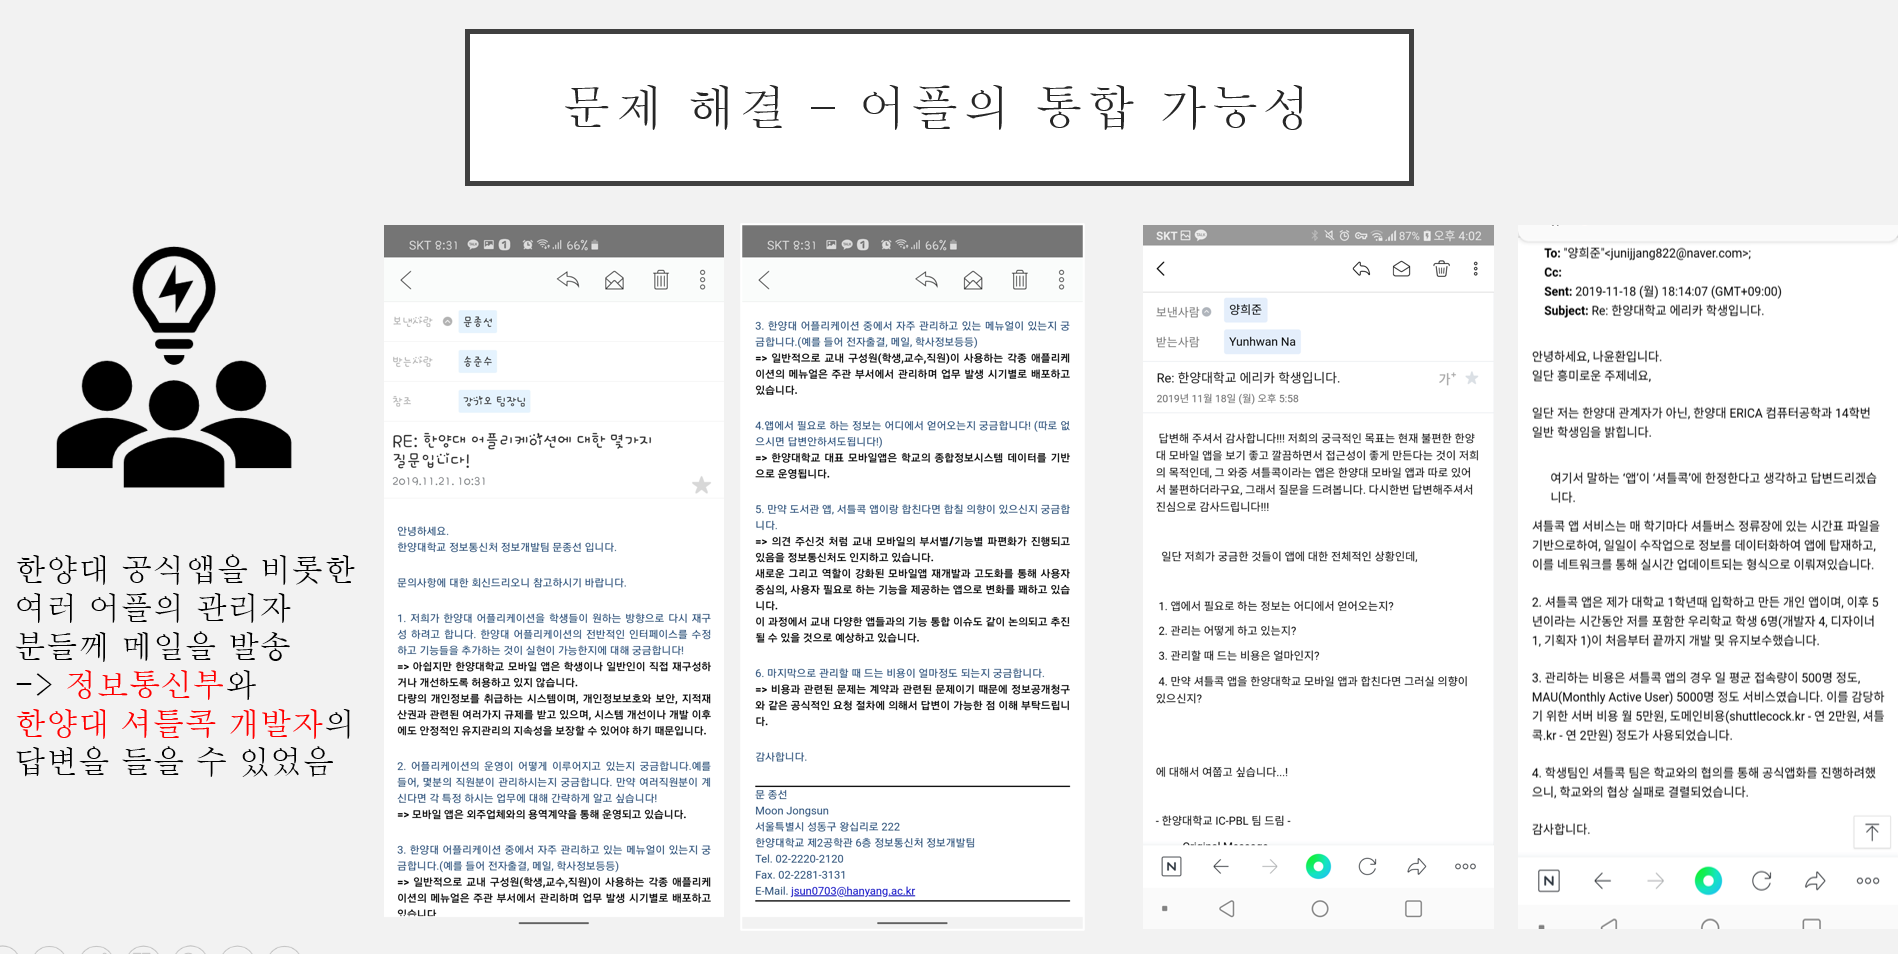
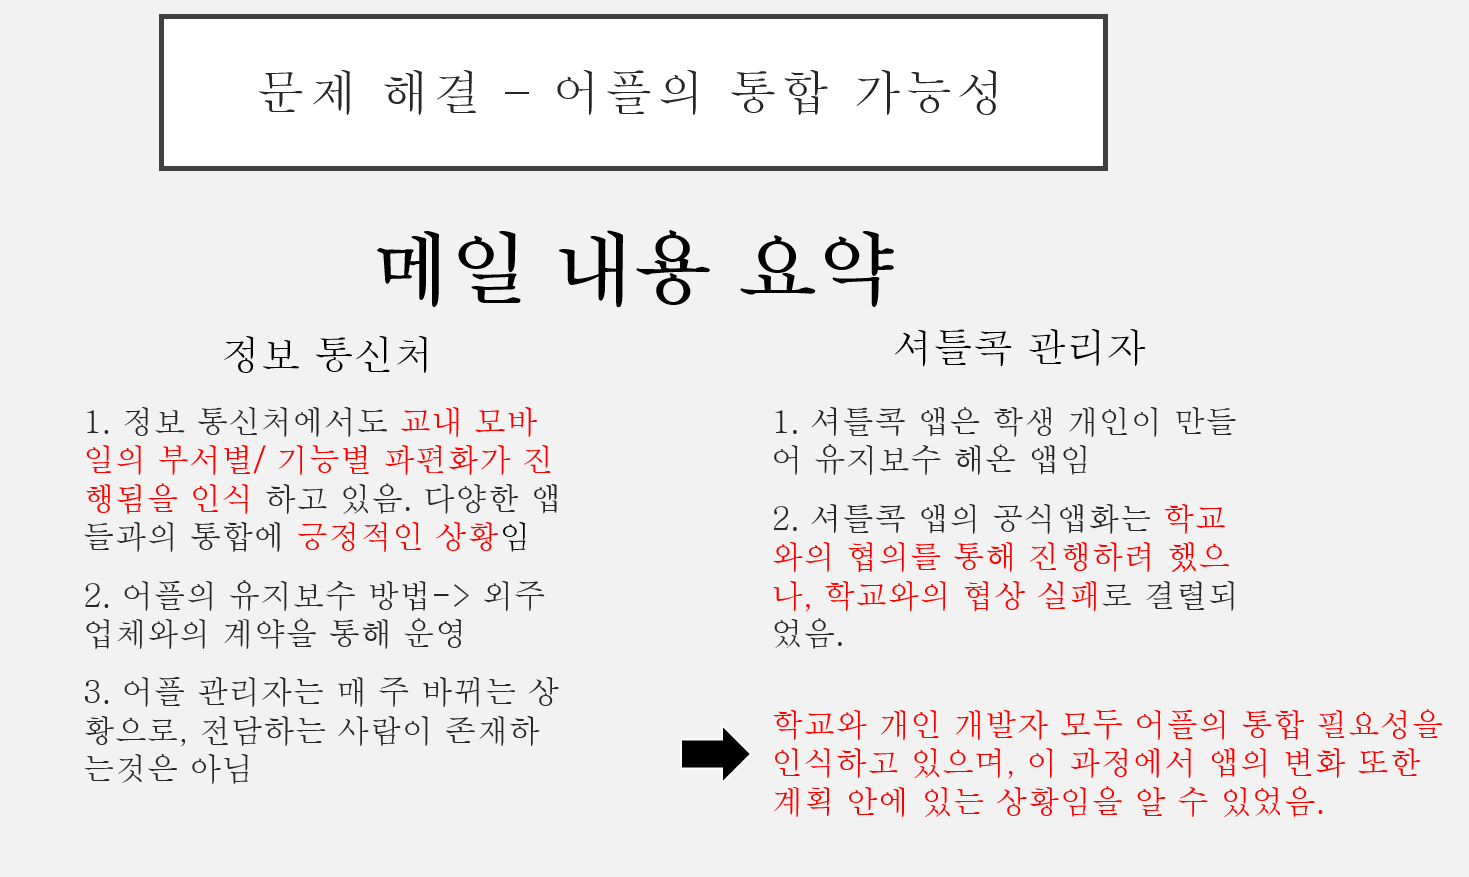
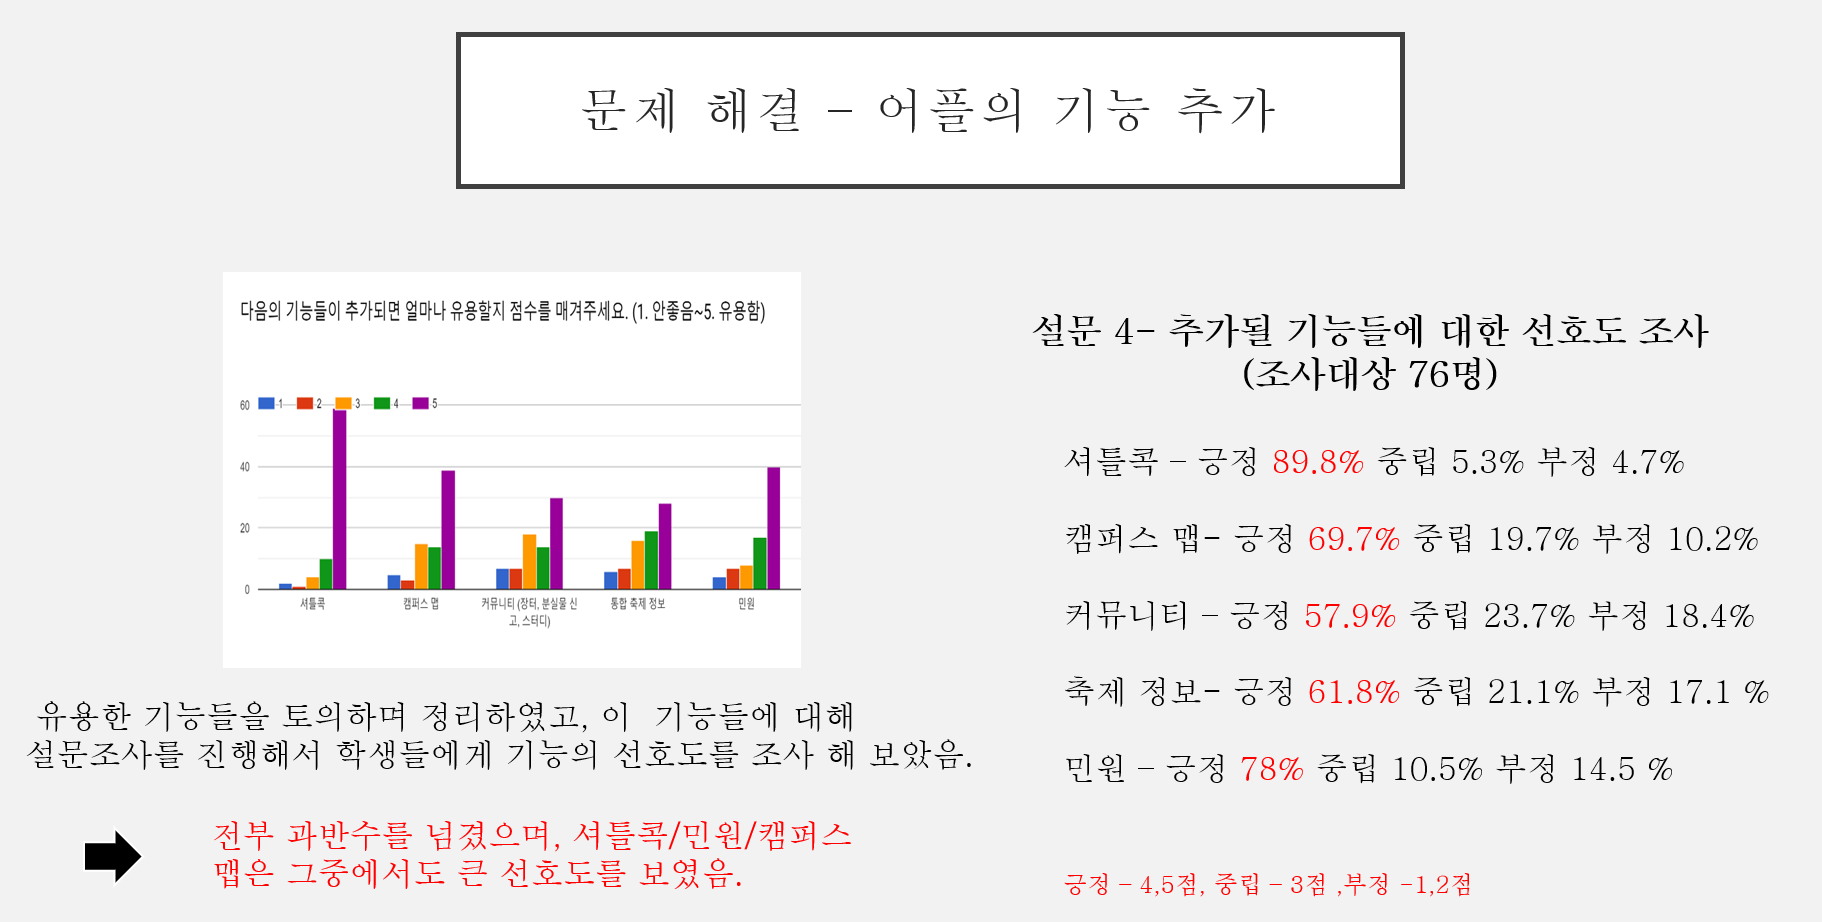
Our team presented the problem of Hanyang University application and conducted a survey accordingly.
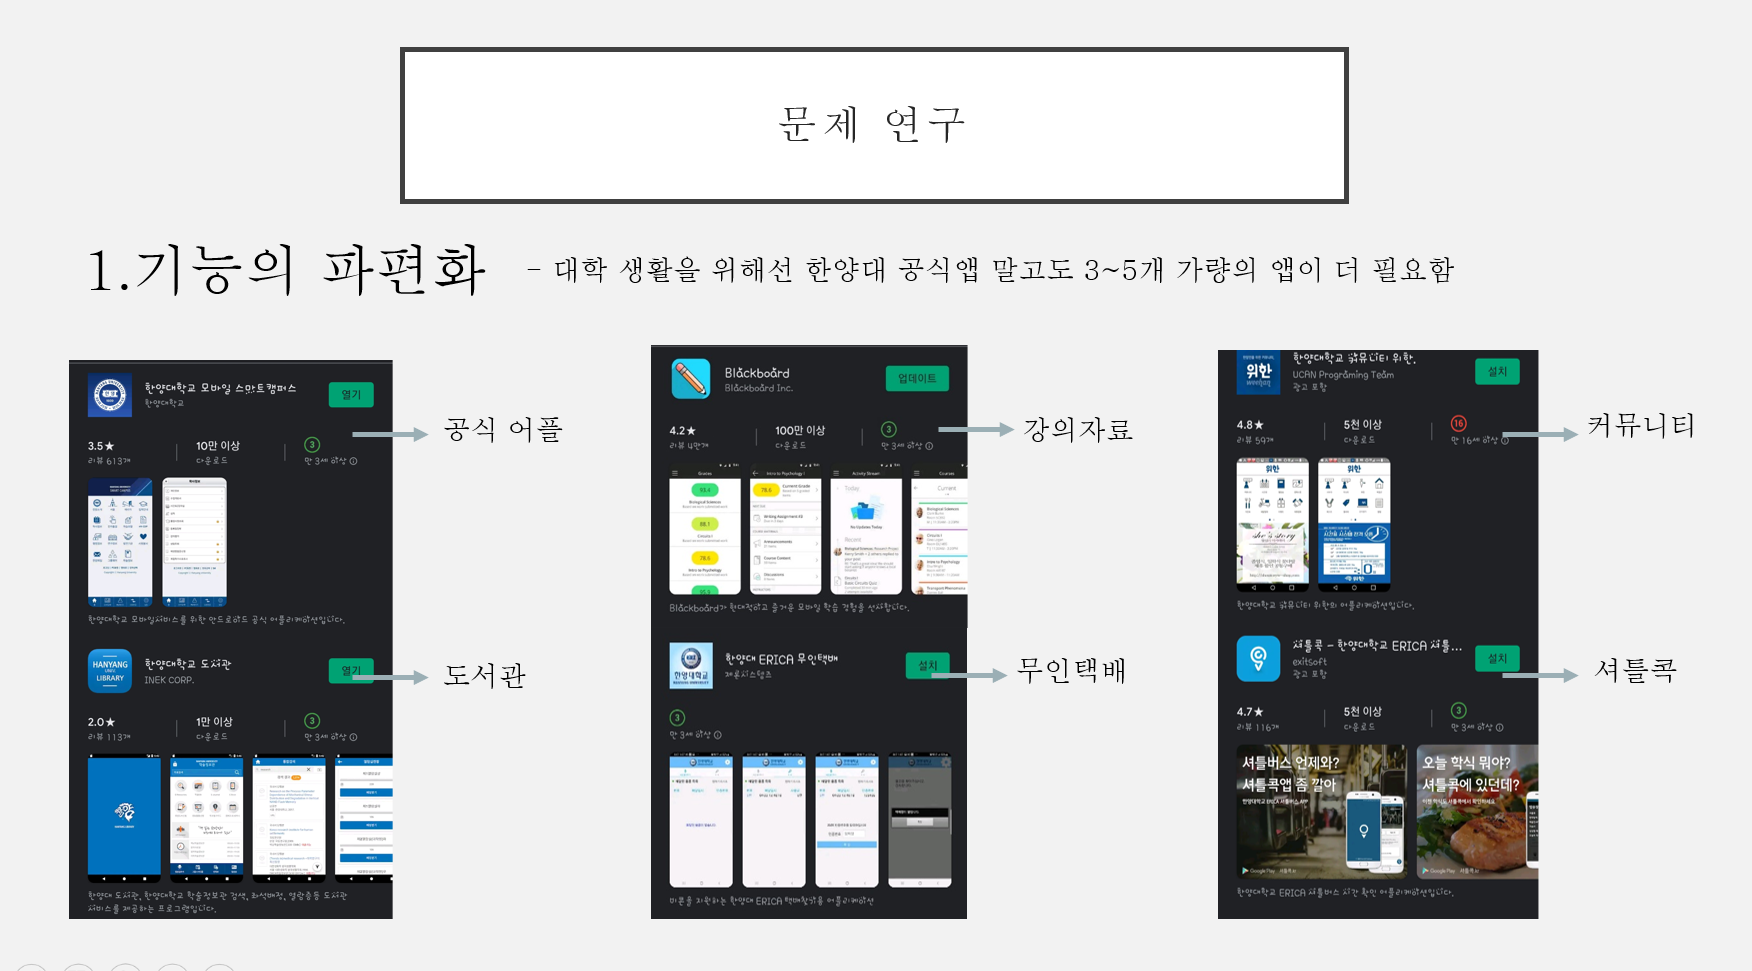
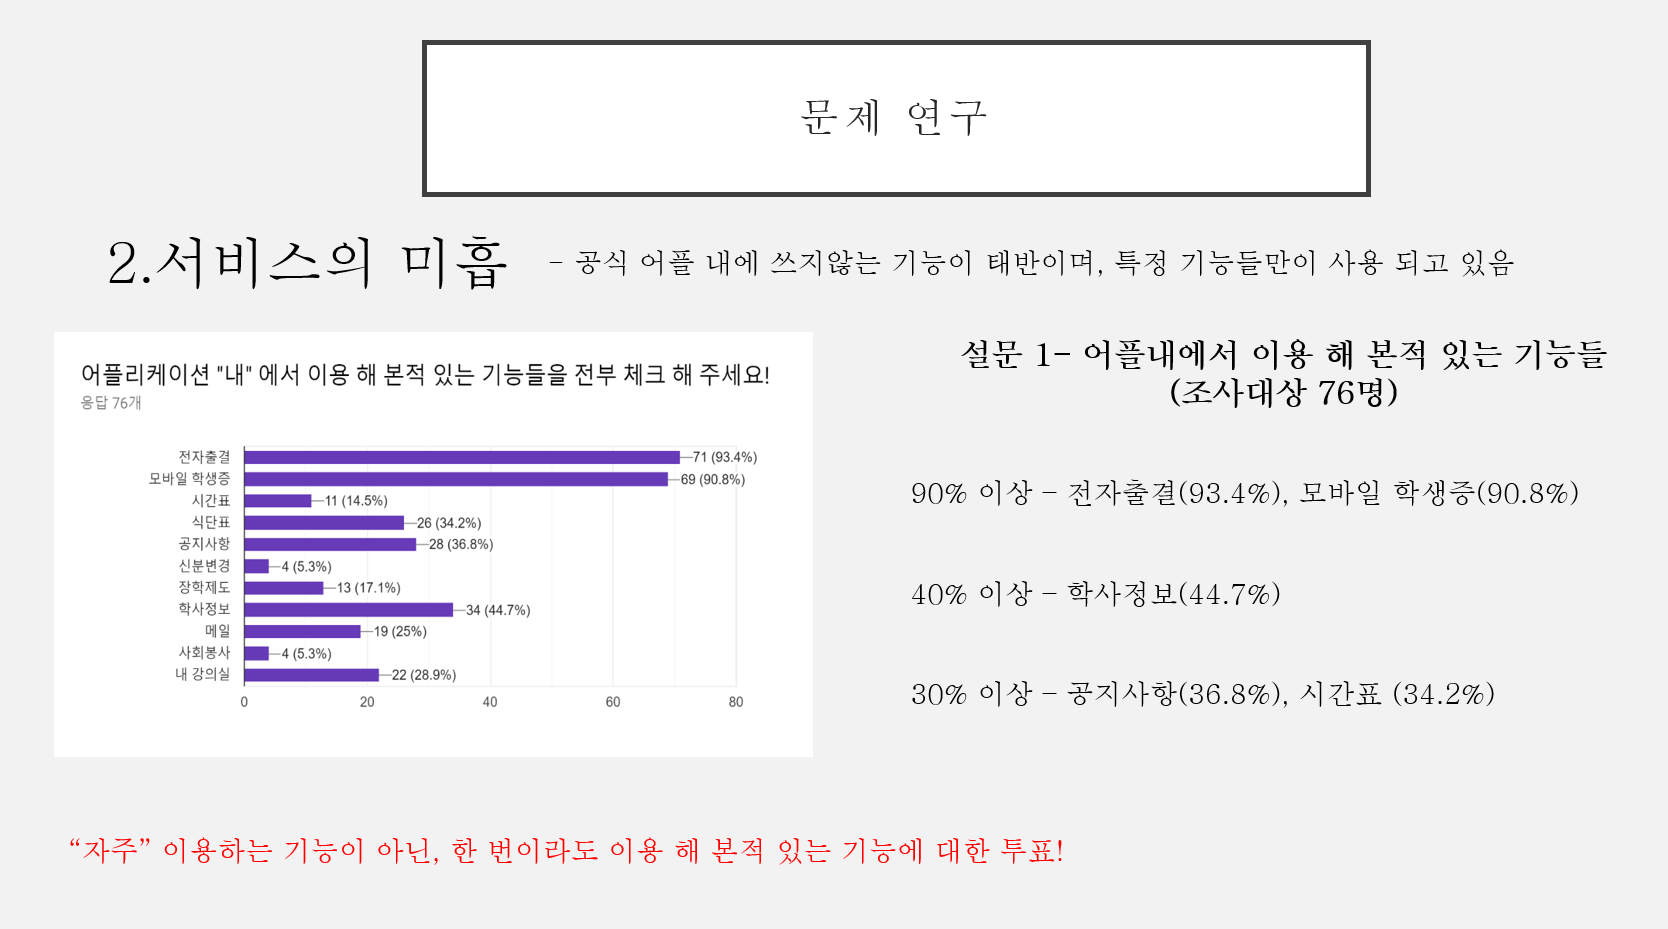
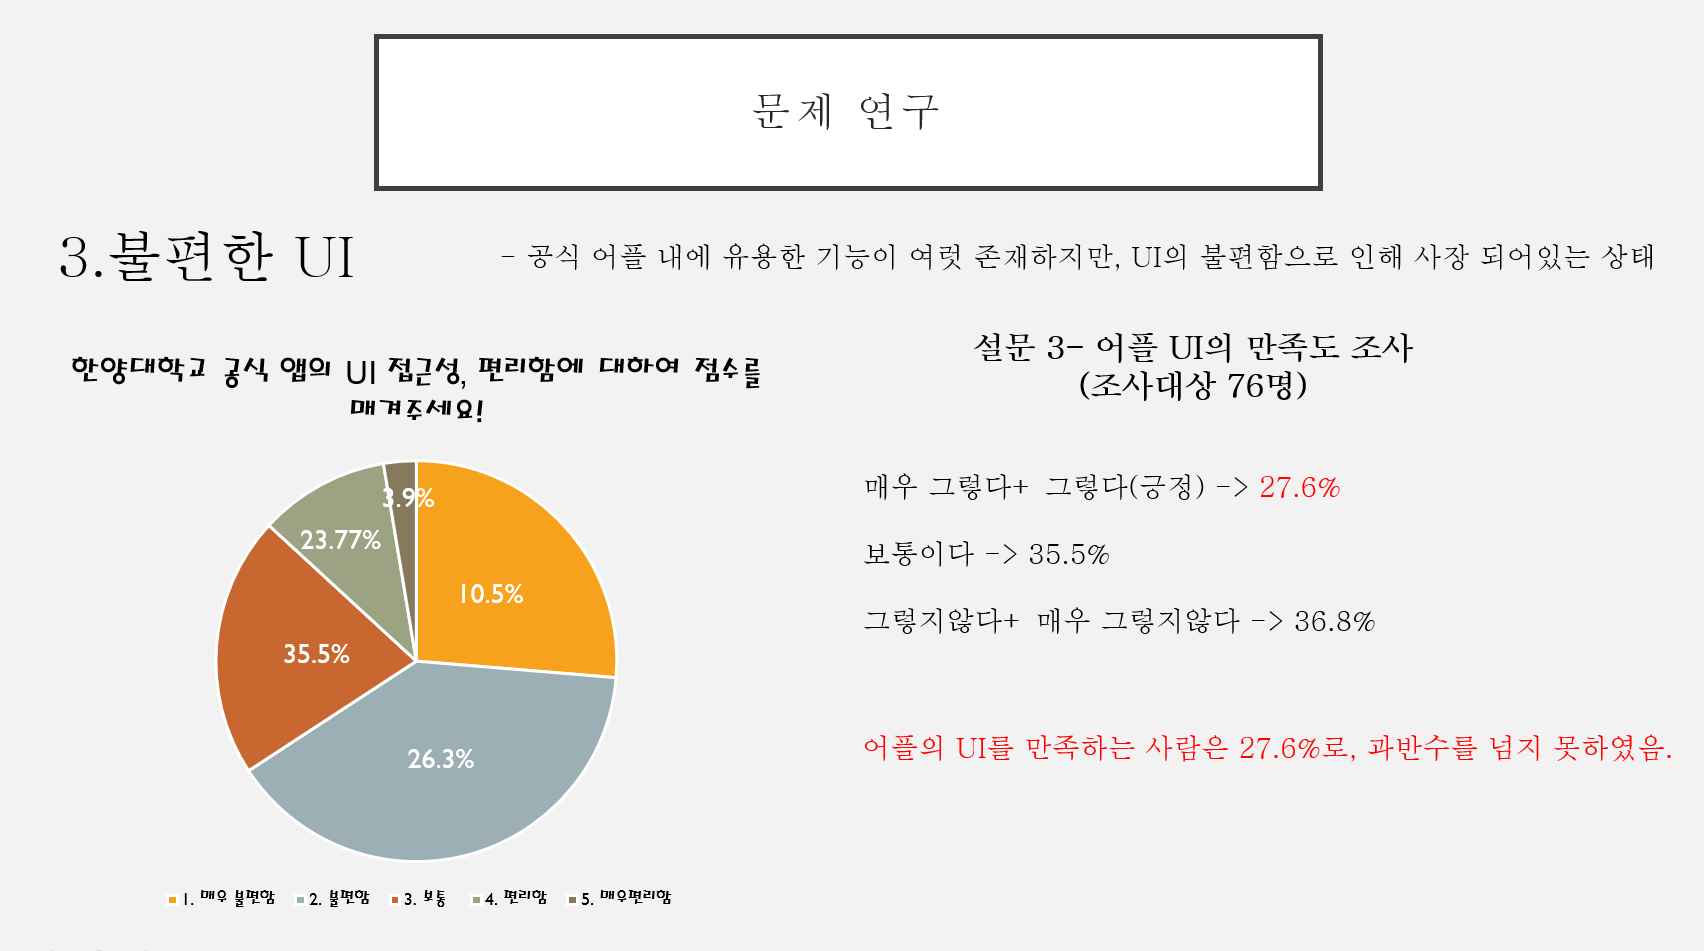
We proceeded with the preparation step for designing the optimal application.
- Current status of application contracts with univ
![Image]()
![Image]()
- Investigate what students need
![Image]()
- Research the optimal GUI by examining various universities
![Image]()
![Image]()
- The final GUI designed by our team Website used
![Image]()
![Image]()
![Image]()
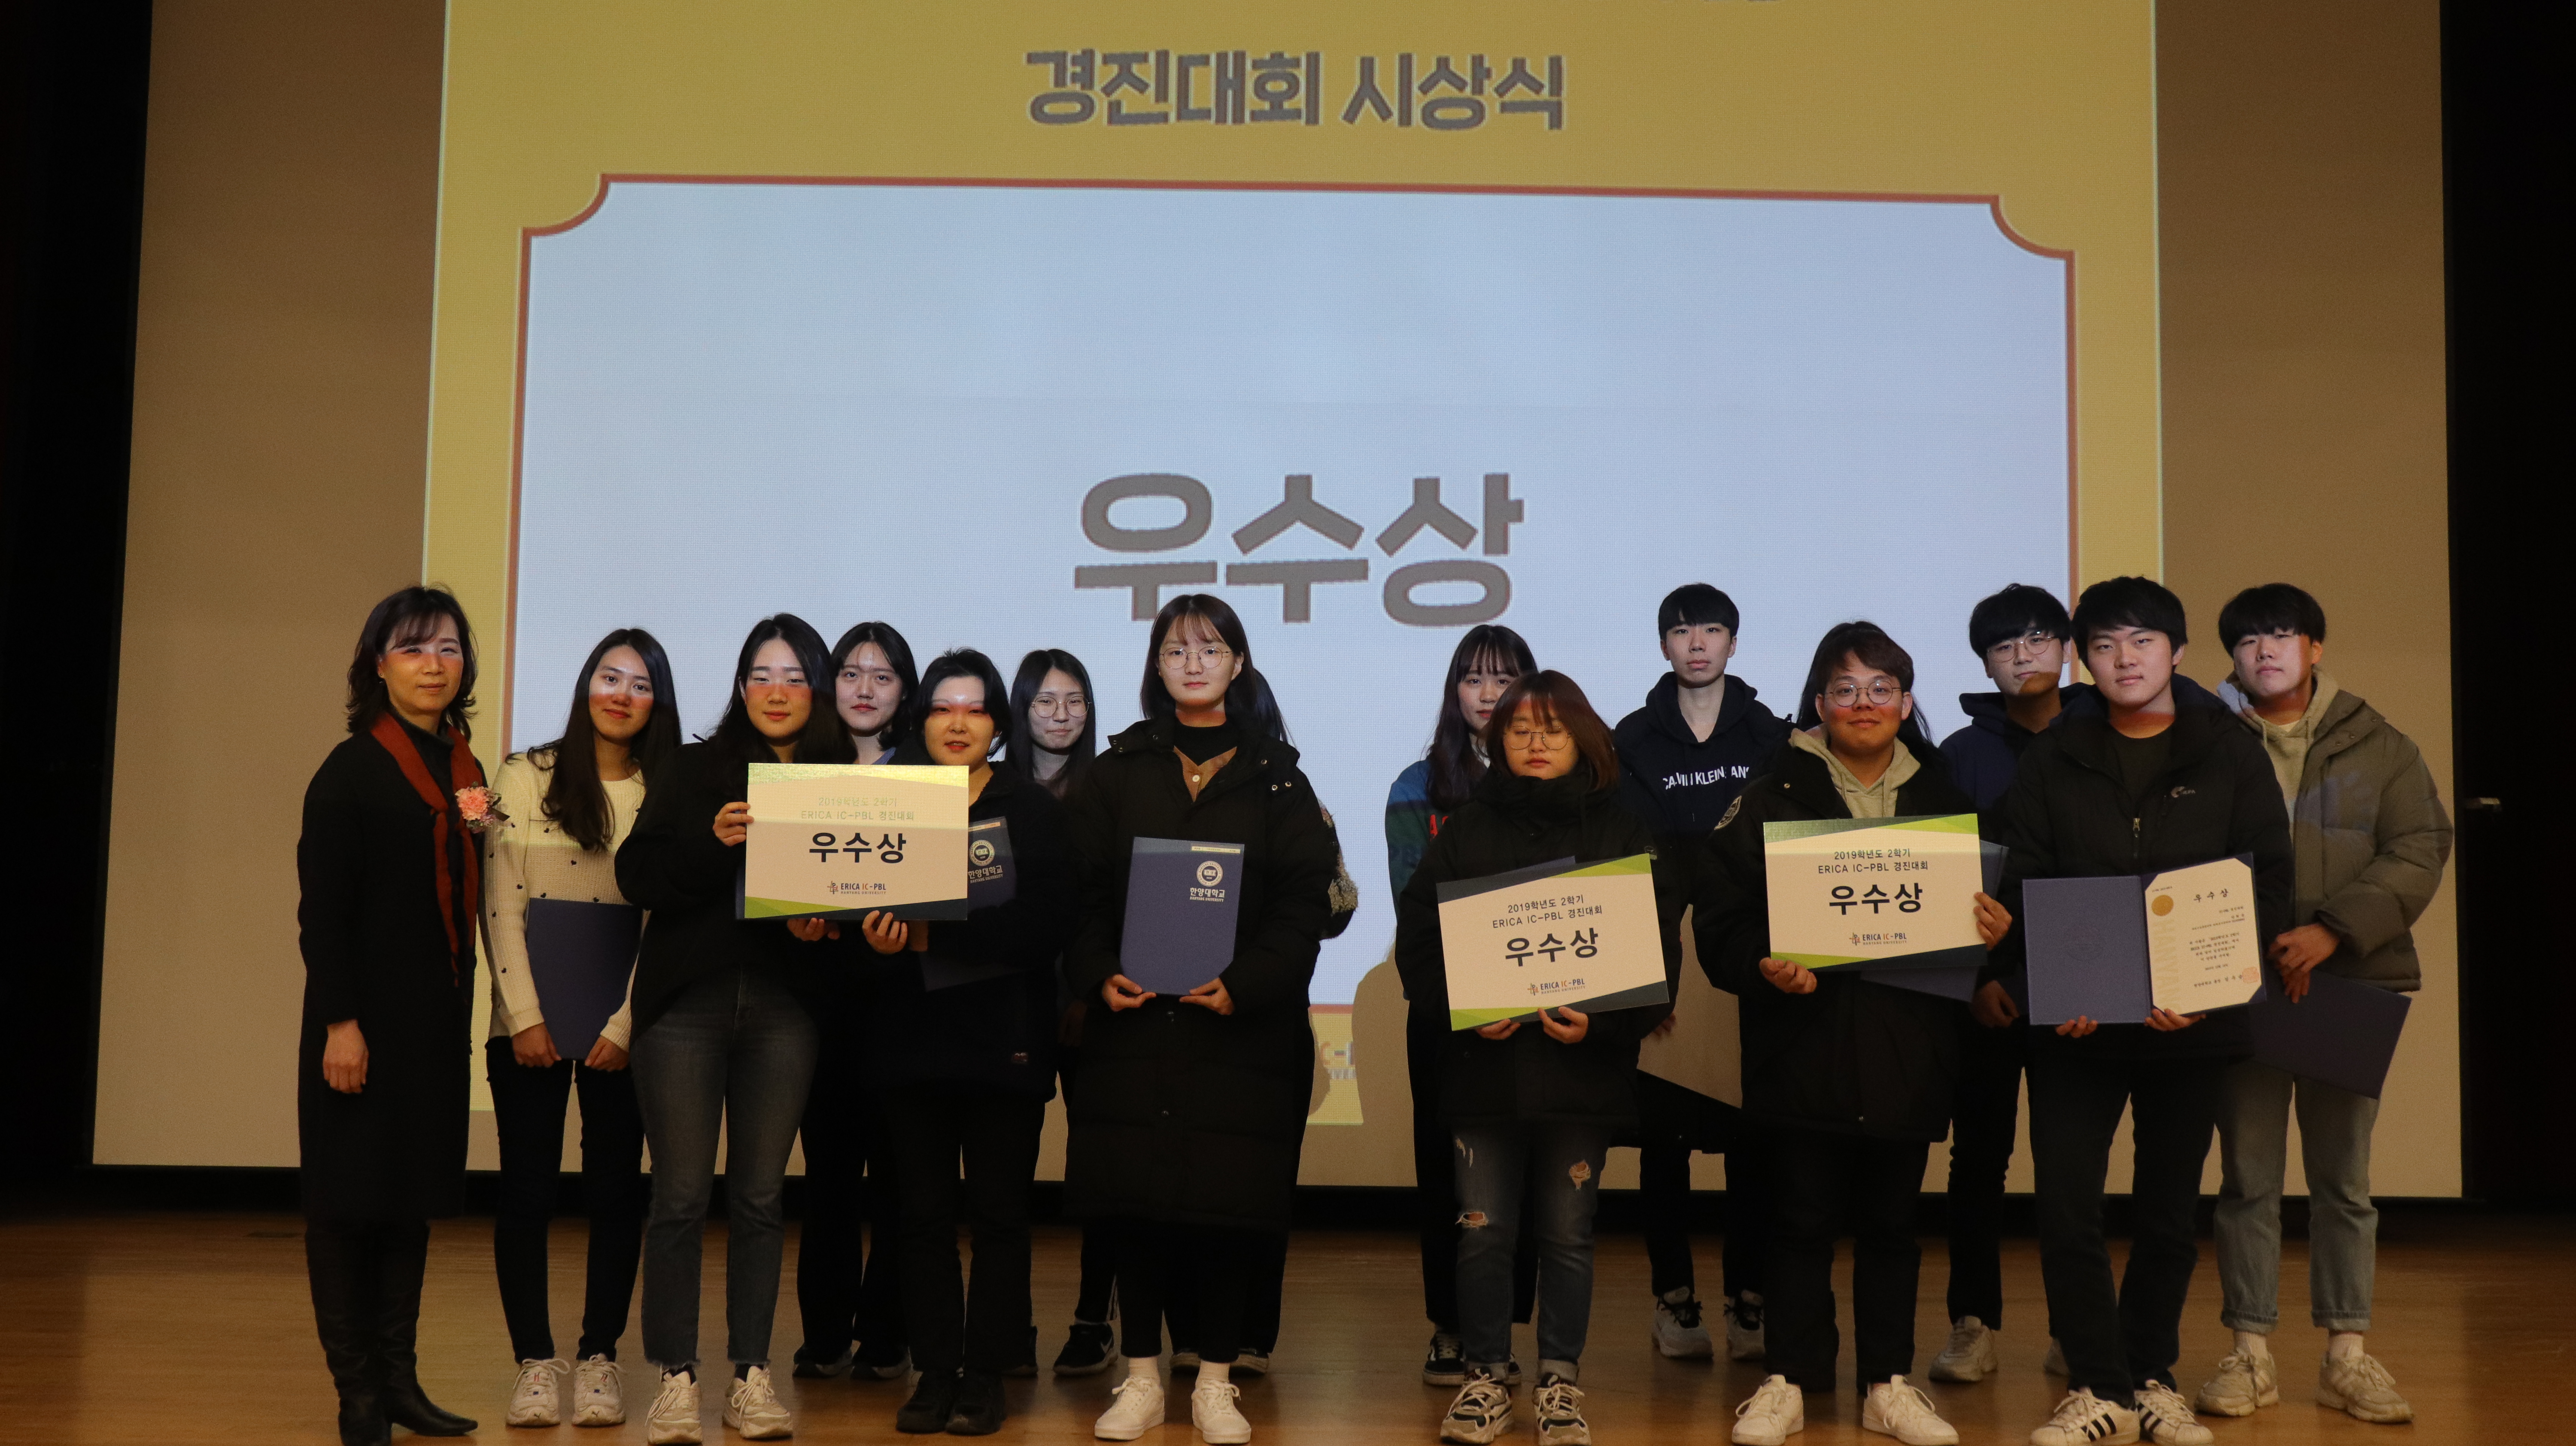
4. Result
We won the Excellence Award ~!
Read less

1. Motivation
The start-up club was started under the guidance of Professor Kim Young-hyun.
Until February, the team members steadily presented their ideas once a week and selected the best start-up idea among them.
After that, I presented my idea to Hanyang University’s start-up education center and I was able to receive support as a start-up club.
I decided to participate in the contest and get the team’s ideas evaluated.

2. Introduction of team members
Leader: Junsu Song (ME)
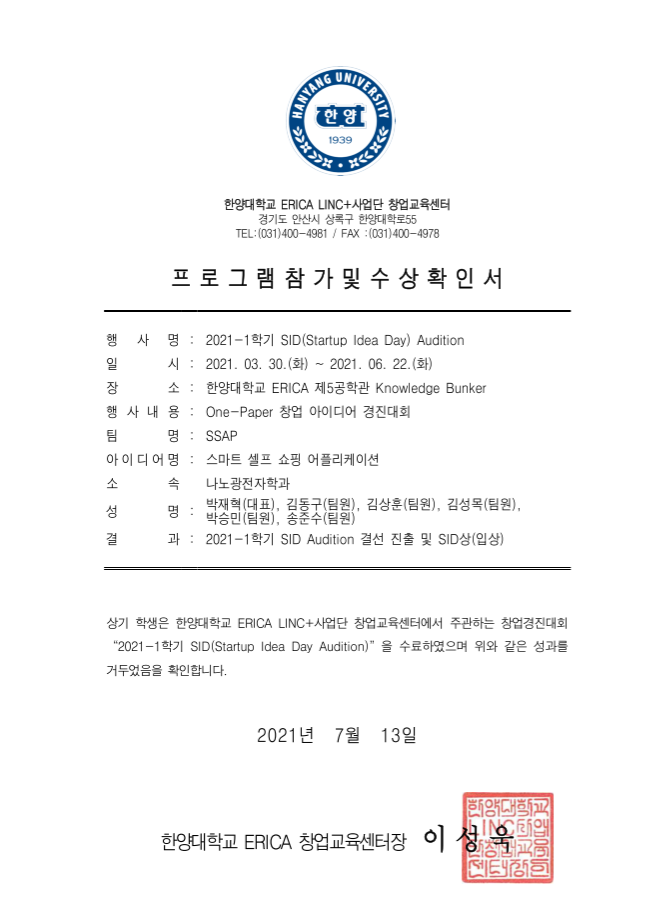
Team members: Kim Sang Hoon, Kim Dong Gu, Kim Sung Mok, Roh Tae Hyun, Park Seung Min, Park Jae Hyuk

3. Process
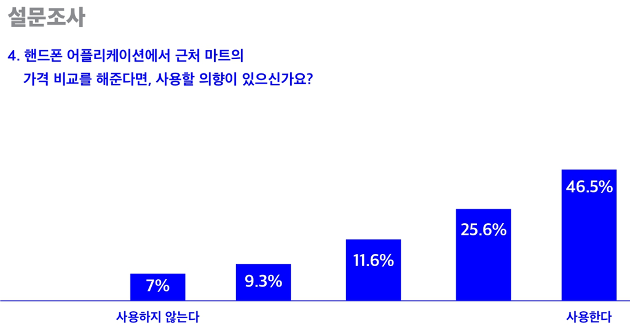
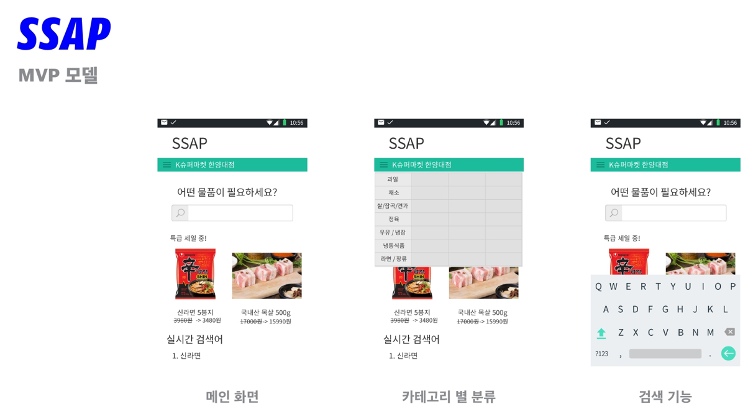

4. Result
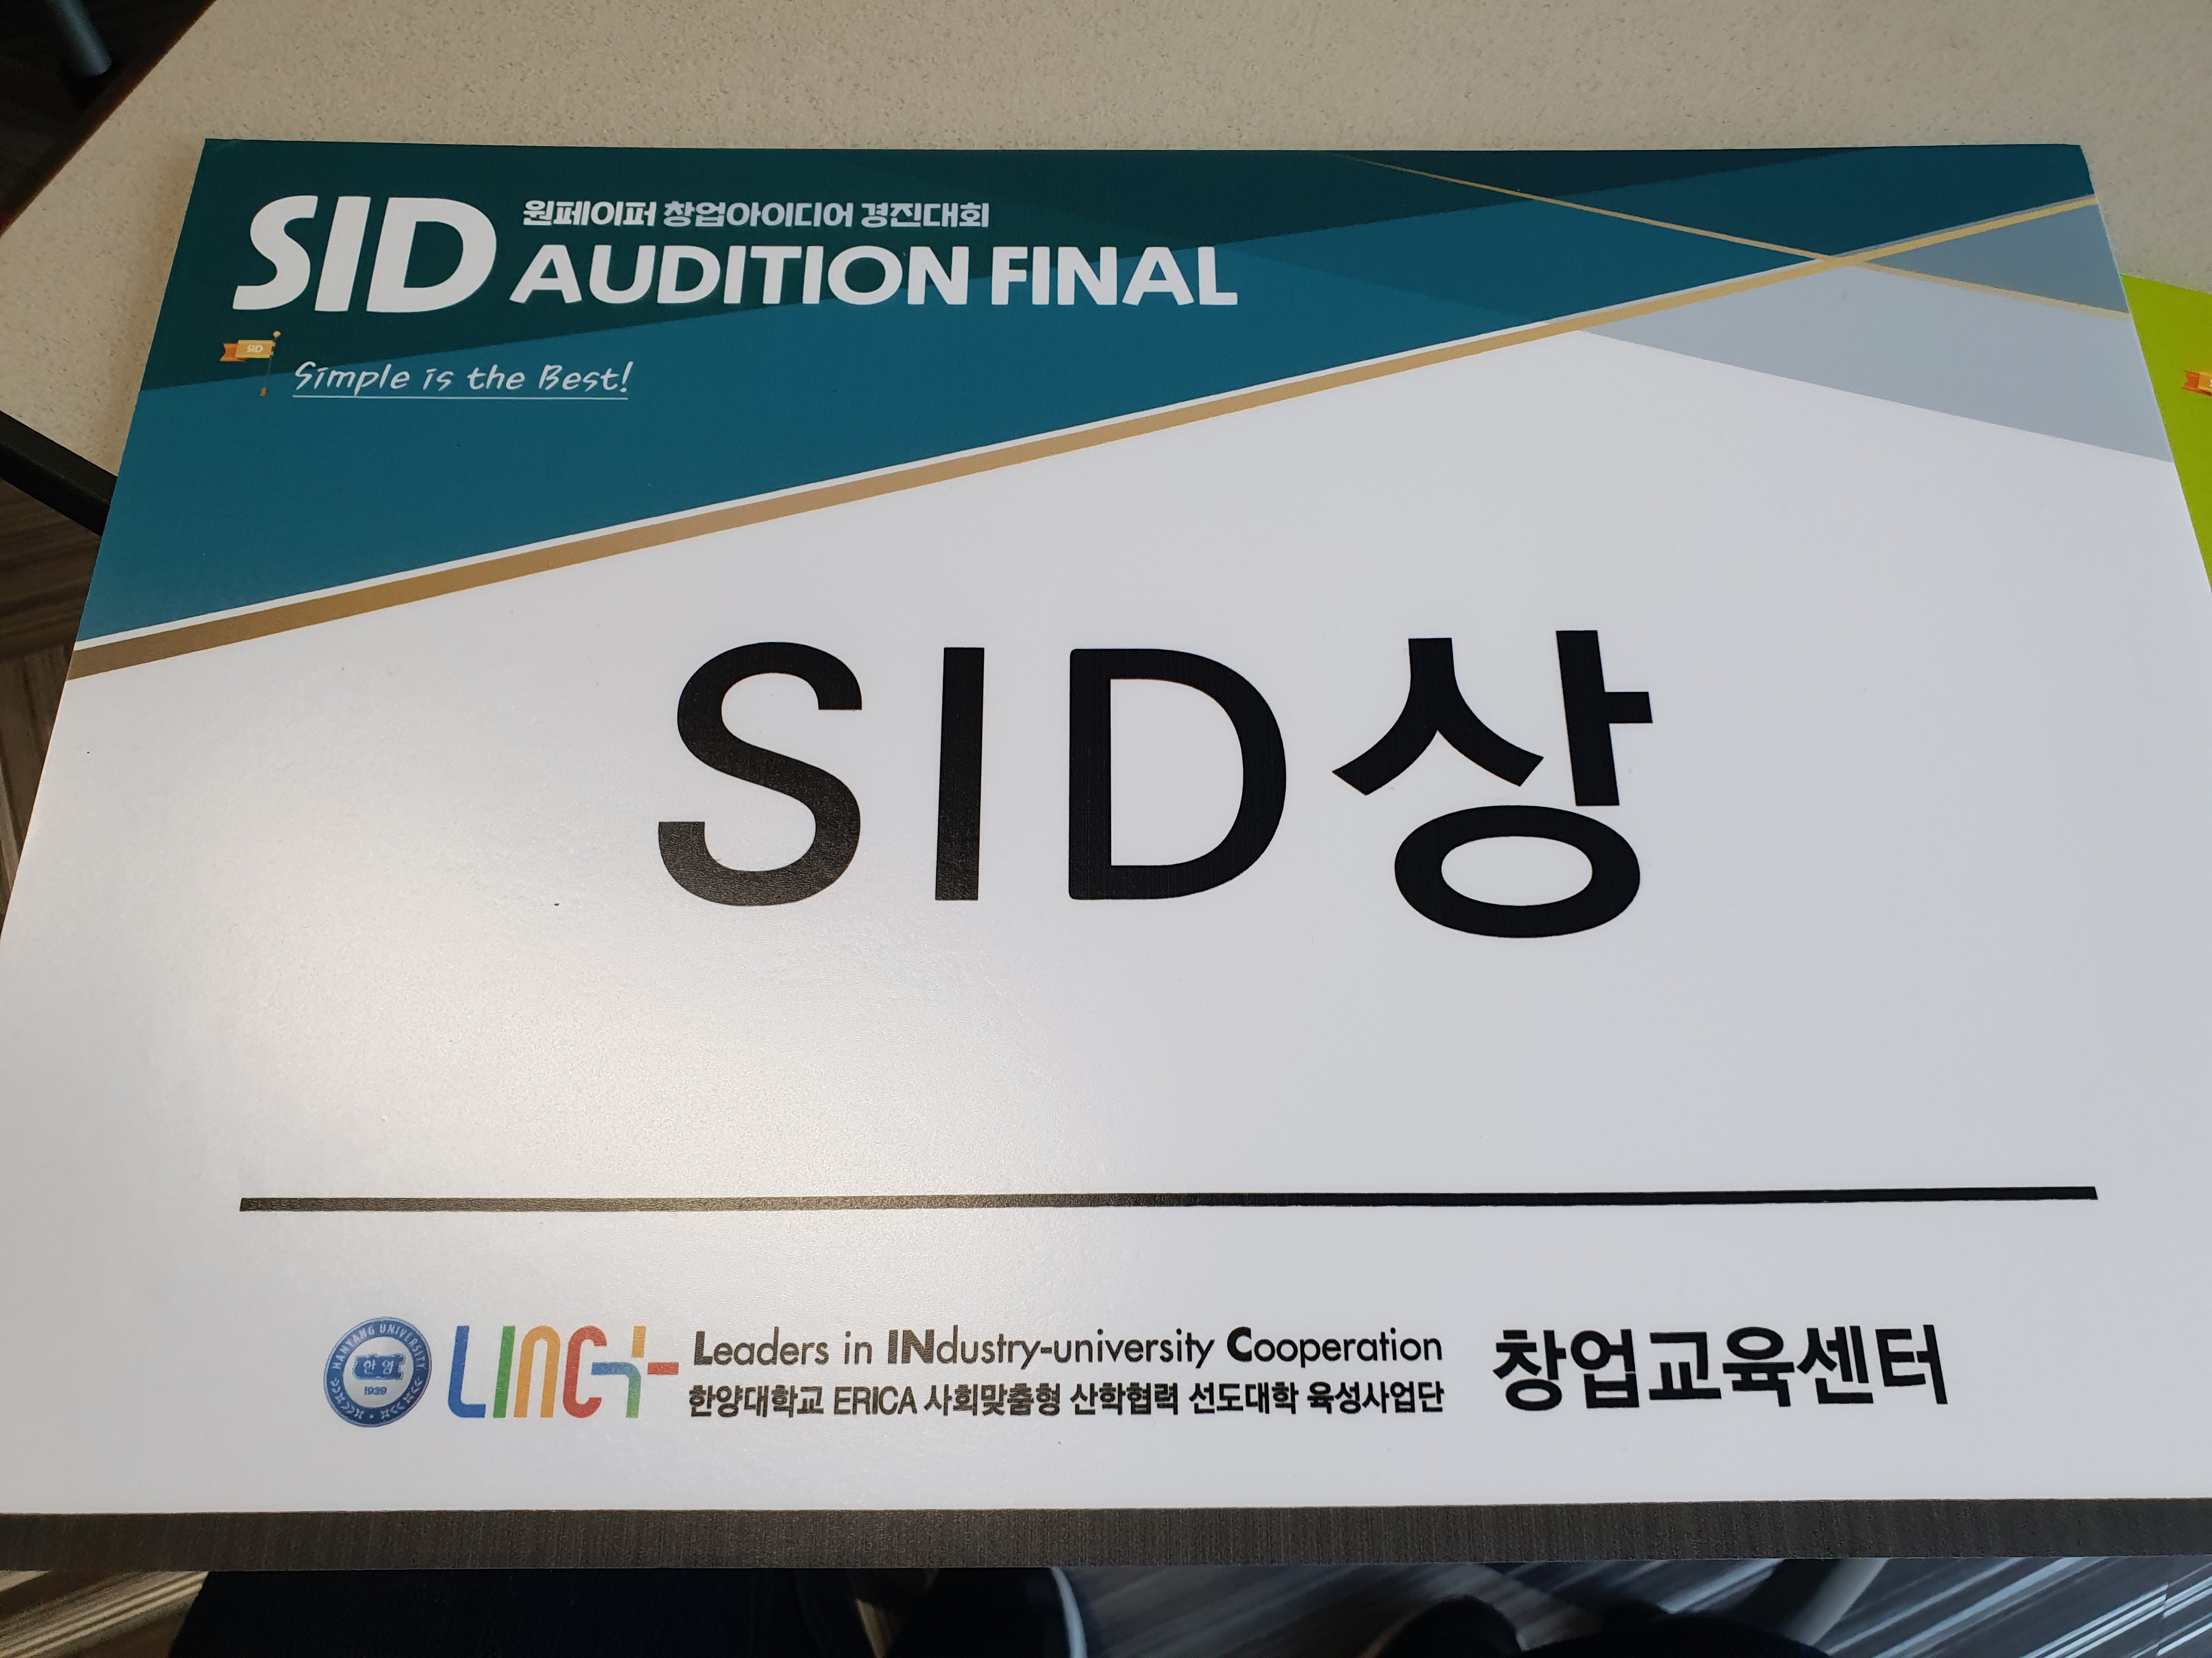
Read less
_info.png)
1. Explain of the contest
_info.png)
2. Introduction of team members
Leader: Junsu Song (ME)
Team members: Kangseok Kim, Seoungmin Park
3. Process

4. Result
_prove.png)

Read less
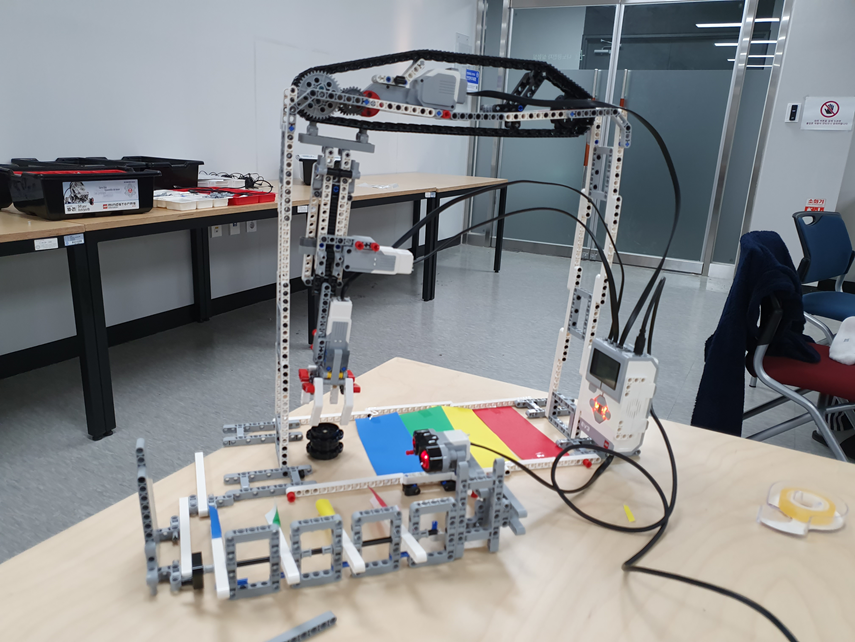
Making Our Own Robot with Ideas (~ 2019-11-30)
The Idea of Photoelectronic Creation : Making Robots for Everyday Life
The Idea Task of Photoelectronic Creation
- Project1: A robot that acts according to the path of various situations.
- Project2 : Making robots necessary for everyday life.
Project1
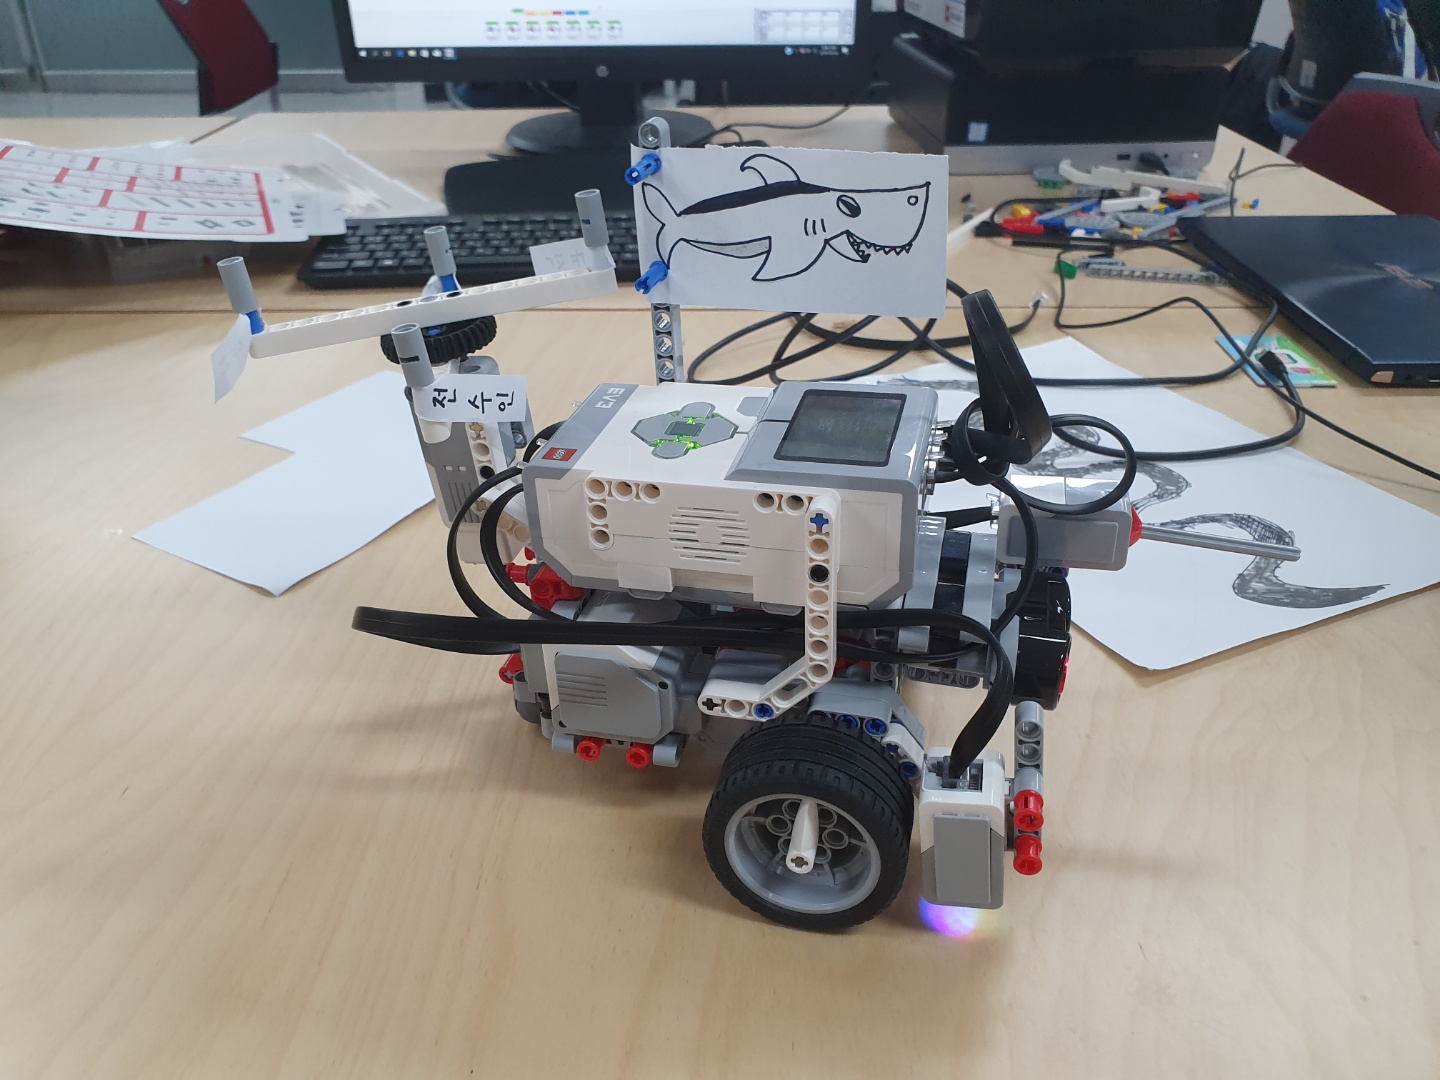
If you want to see Video, please click the link and refer to ideal.mp4!
Project2
Reason for creation:
As more people go to eat alone, there will be more tables for one person

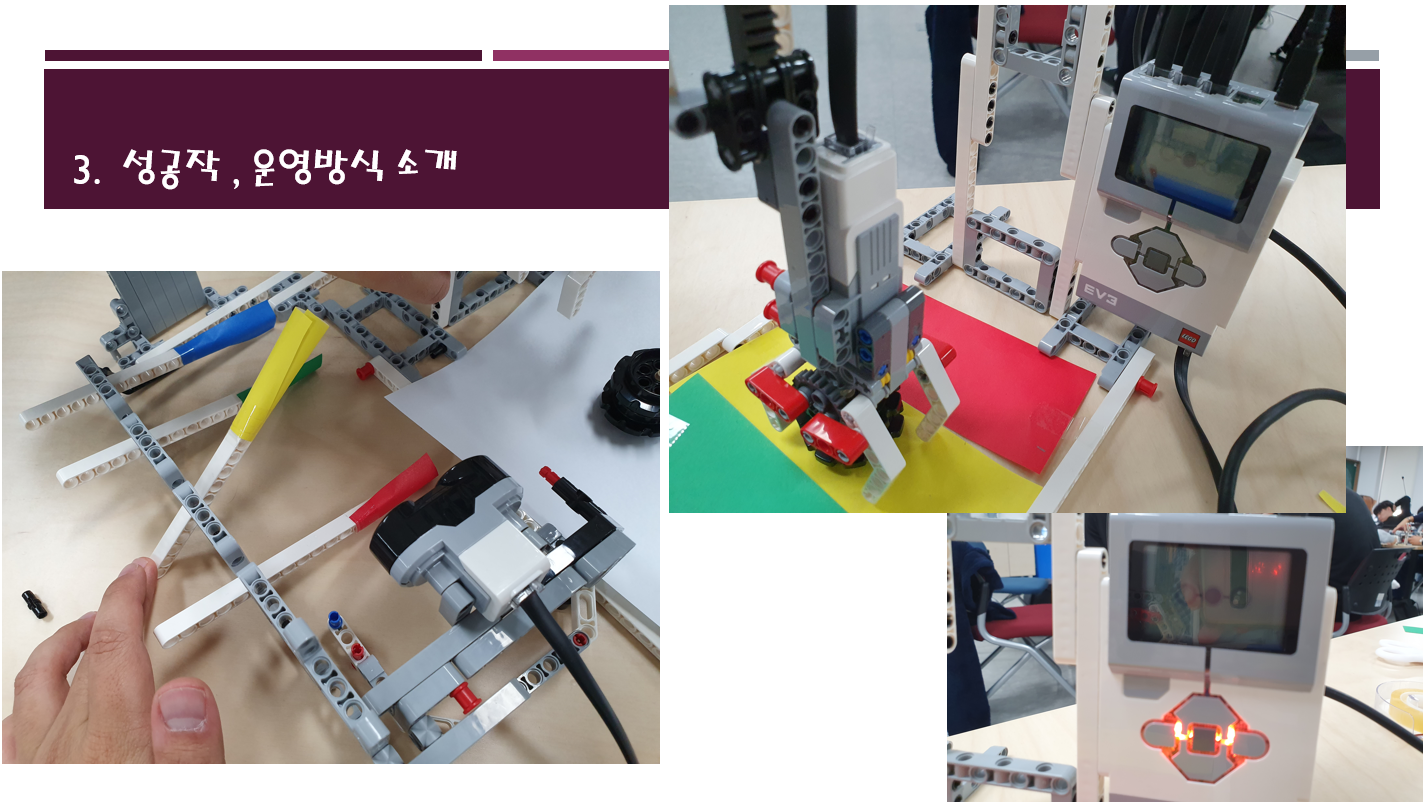
If you raise the stick, it moves the object to the right color.

Automatic Data Analysis GUI (~ 2021-06-21)
Engineering Programming 2 : Data Analysis Using Python
1. Introduction of team members
Team members : Kangseok Kim , Choi Ilgyu
2. Process
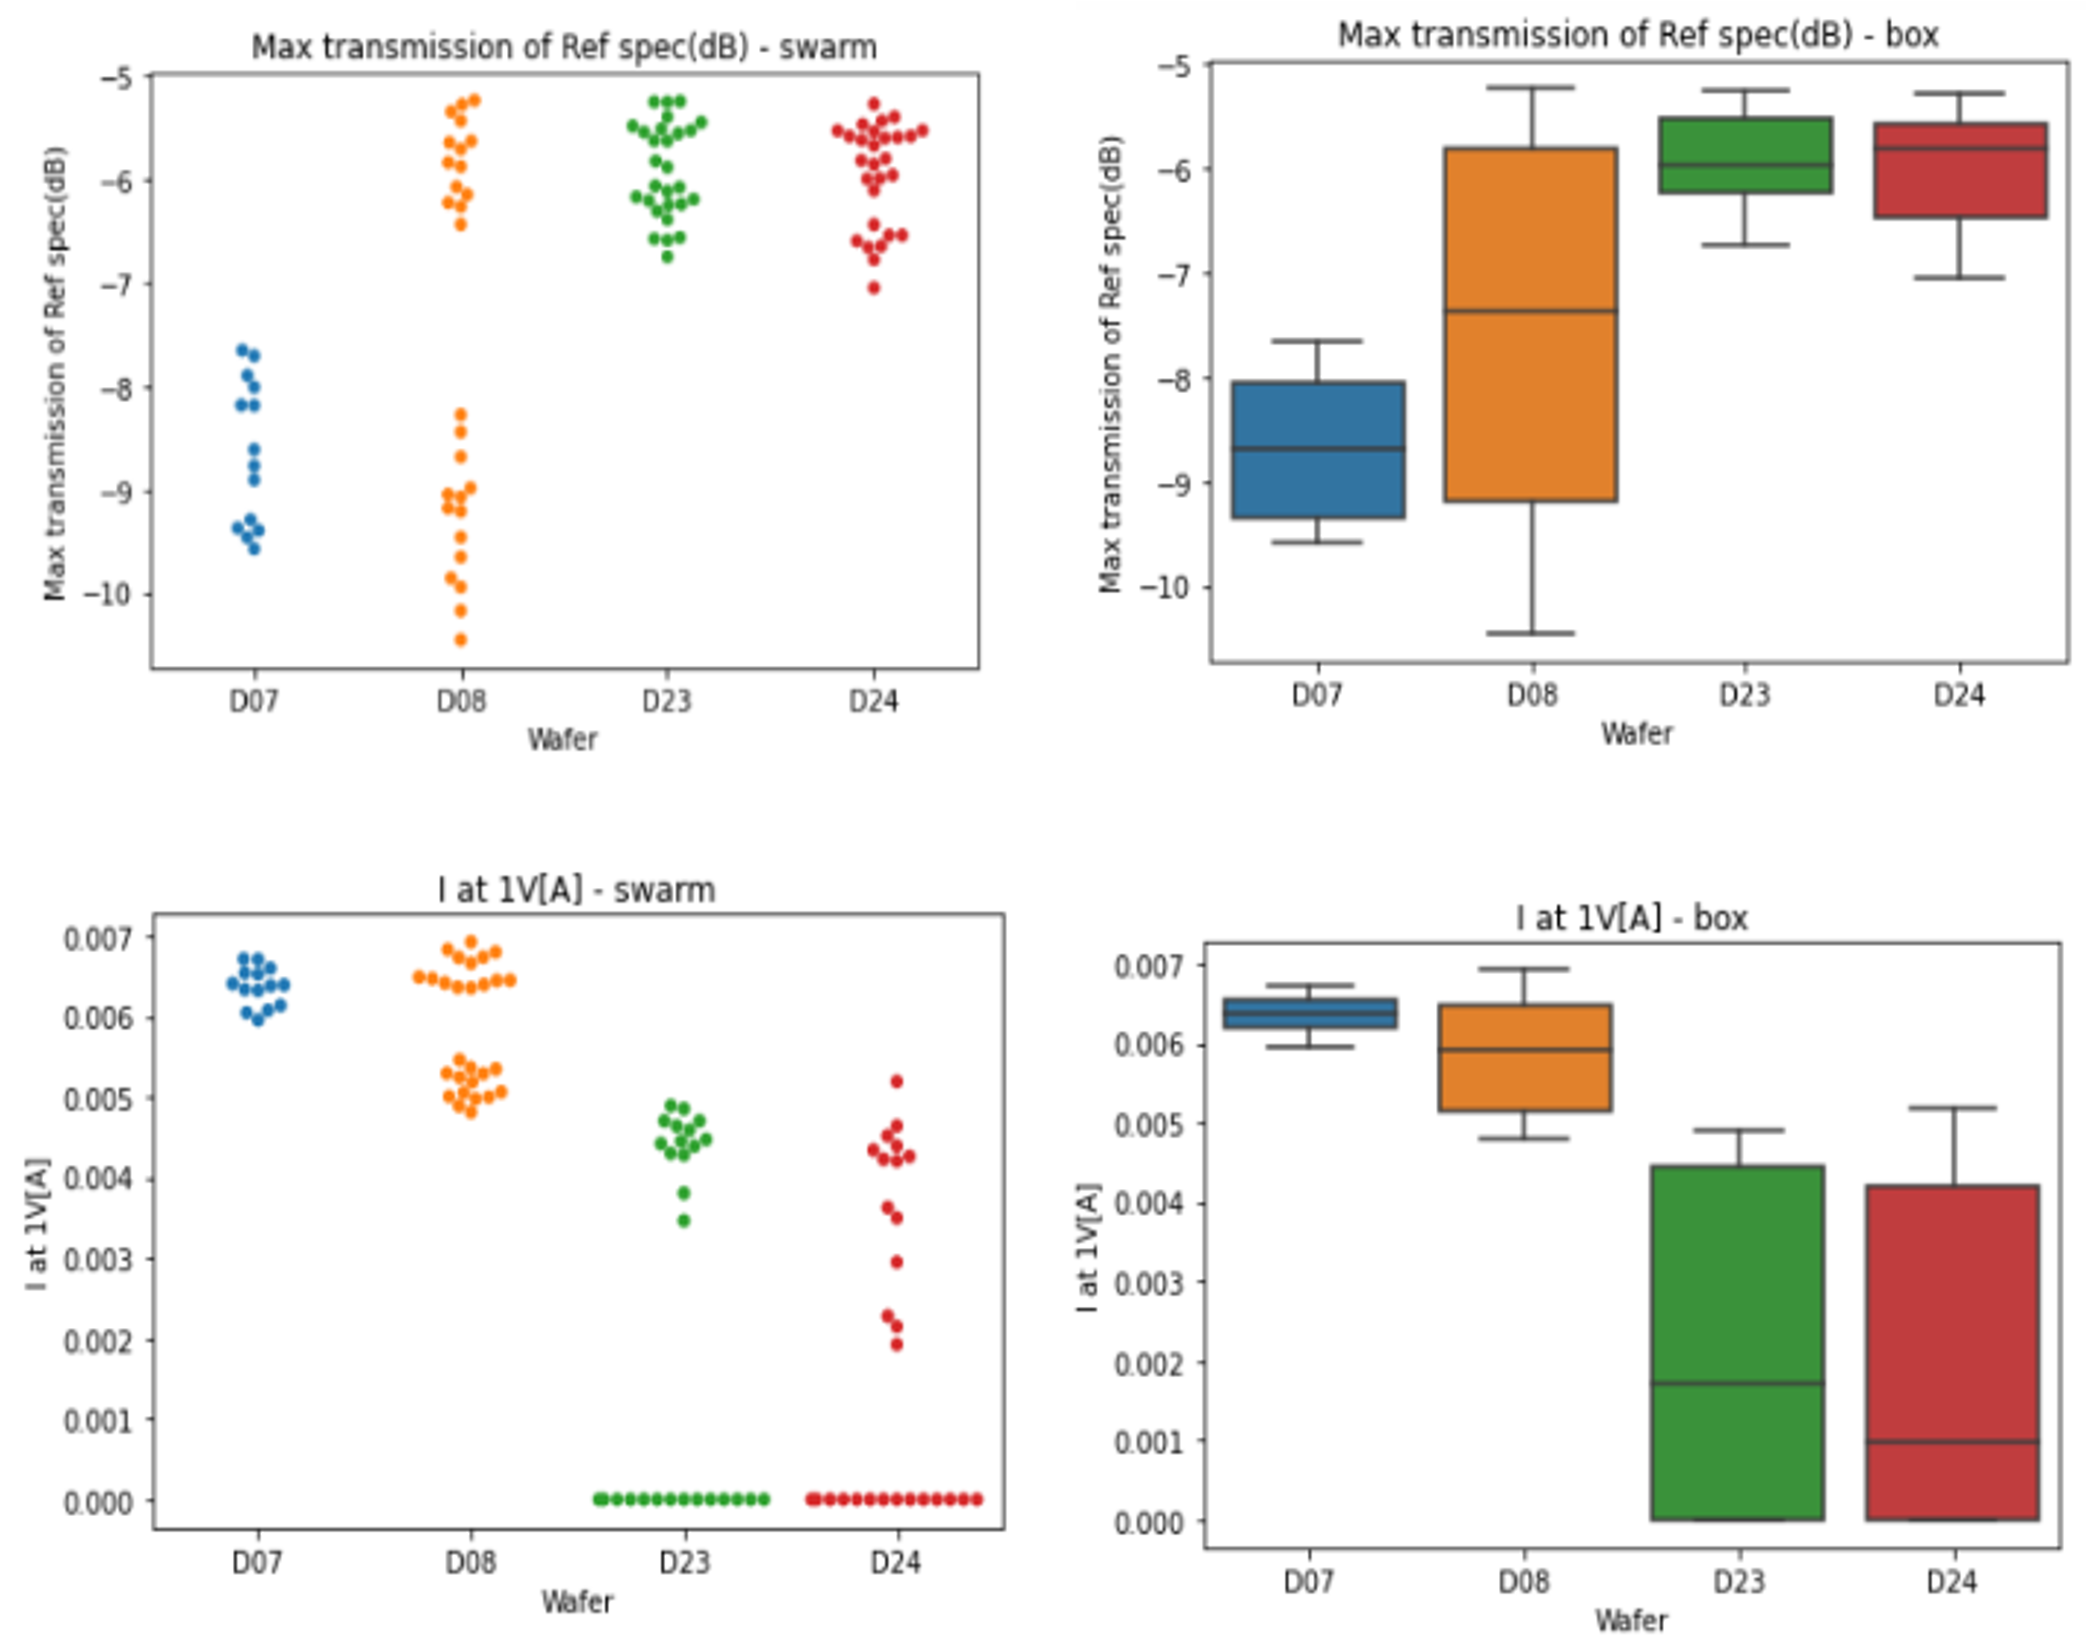
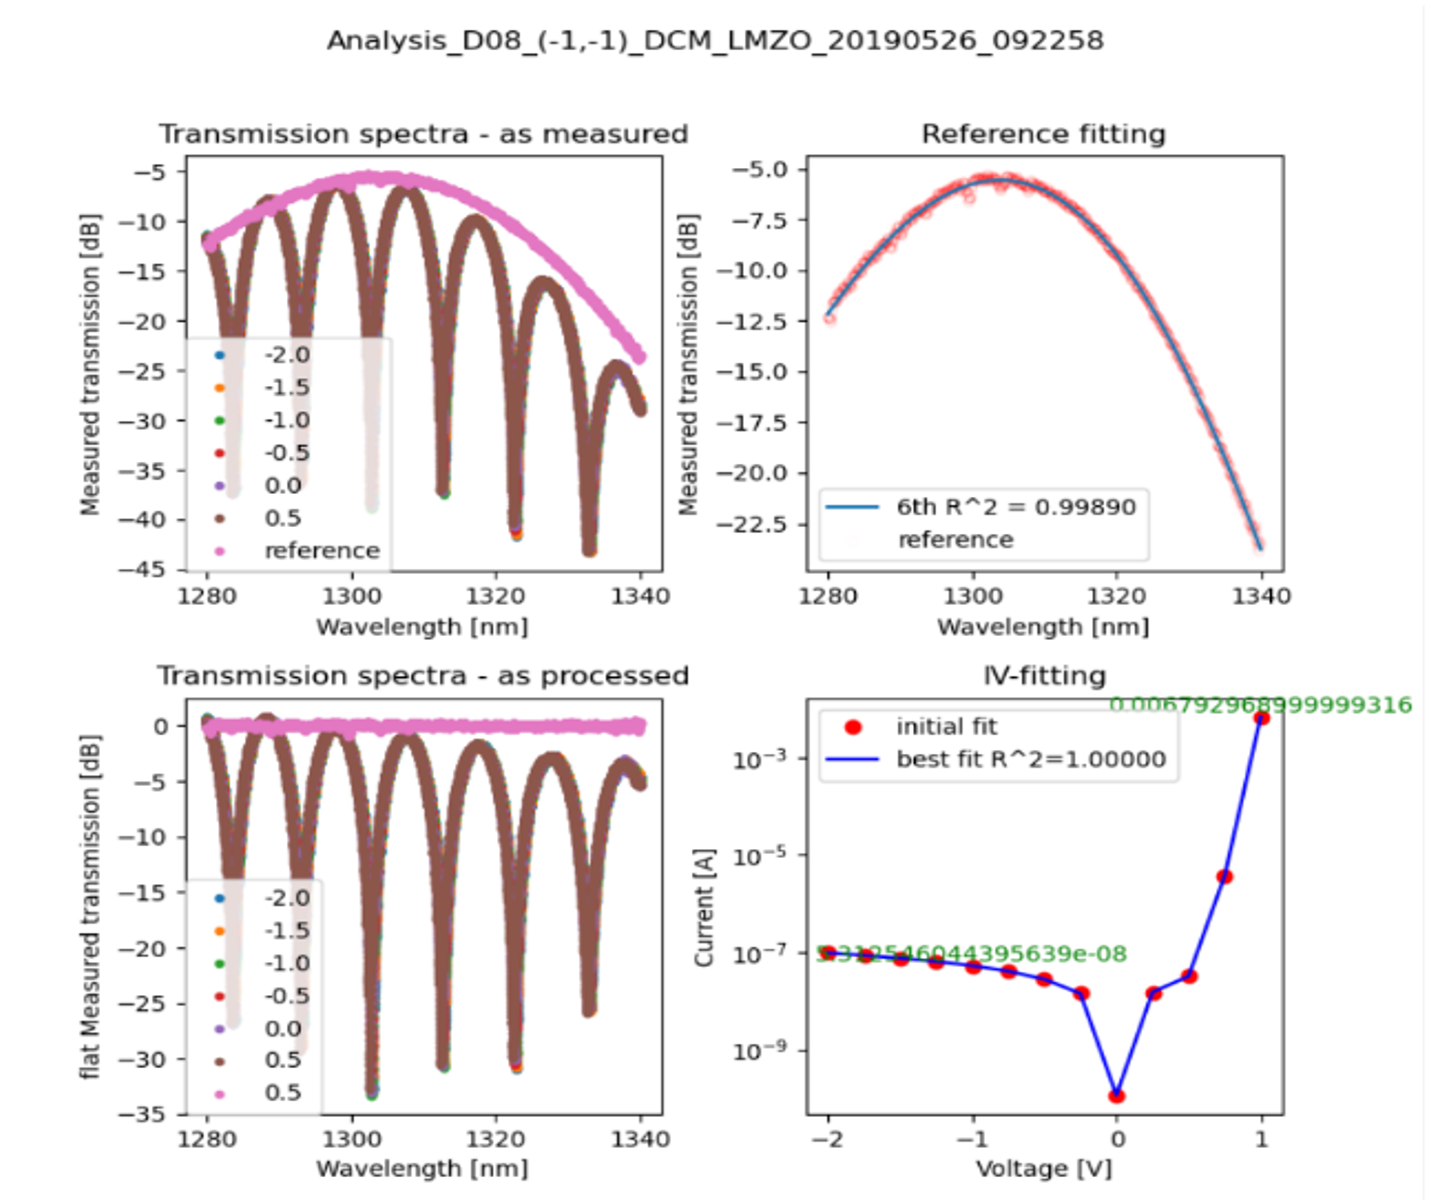
I made a project through Python. Put the values measured by the semiconductor device into the project.
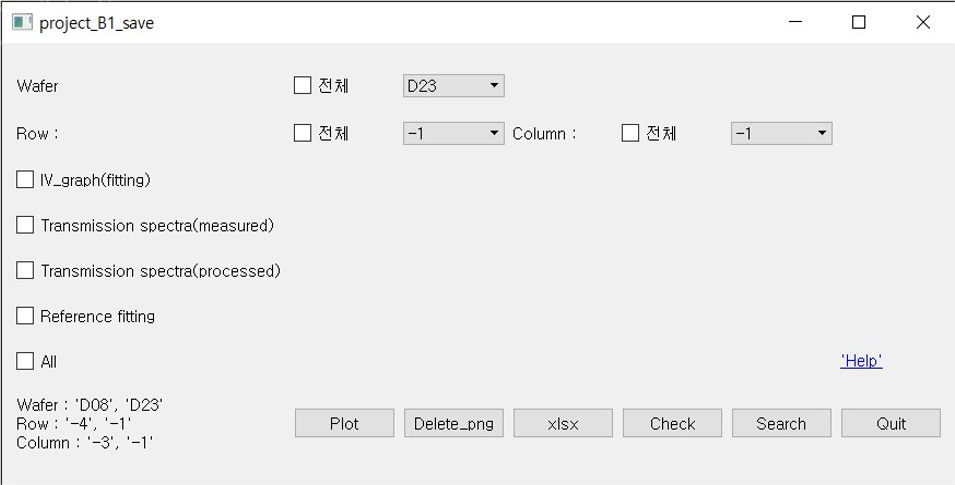
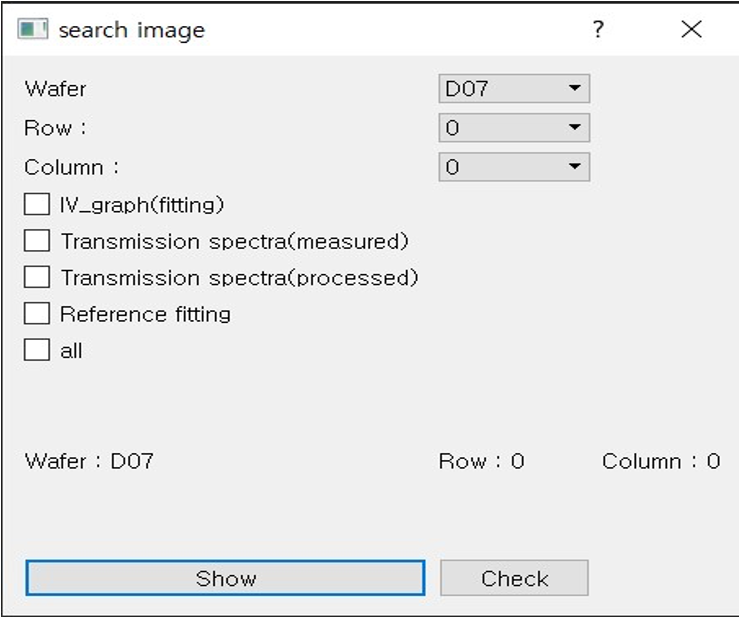
The project is designed to automatically create graphs as shown in the picture below.
Read less





4.png)
5.png)
.jpg)
